Покупка сервера для Melbis Shop
Несмотря на то, что фраза «Покупка своего сервера» звучит пугающе сложно, на самом деле сегодня арендовать сервер так же элементарно, как зарегистрировать почтовый ящик.
- Во-первых, надо сразу сказать, что вам не придется куда-то ехать и покупать реальное железо. Всё проще: вы арендуете его прямо в дата-центре, не выходя из дома.
- Во-вторых, не стоит пугаться, что сервер — это технически сложное и дорогостоящее устройство. Да, он такой же сложный, как и ваш смартфон, но пользоваться им на самом деле довольно просто.
- В-третьих, вам совершенно не нужно прямо сейчас покупать или арендовать целый физический сервер. Современные технологии позволяют провайдерам дробить один реальный сервер на множество виртуальных. Это дает огромное преимущество: мы можем арендовать виртуальный сервер за сущие копейки. И, что самое главное, в дальнейшем мы сможем легко расширять его мощности по мере роста бизнеса. Это просто здорово!
Итак, для начала надо выбрать дата-центр. Их достаточно много, но мы советуем выбирать крупные и проверенные временем. Для примера мы рассмотрим аренду сервера в хорошо известной компании DigitalOcean. Эта компания настолько технологична, что имеет несколько десятков дата-центров по всему миру!
Шаг 1
Перейдите на сайт компании: https://www.digitalocean.com и нажмите кнопку "Sign Up" для регистрации.
Выберите опцию "By signing up below, I agree..." и нажмите кнопку "Sign Up with Google". Это означает регистрацию с помощью Вашего аккаунта Google. Конечно, Вы можете выбрать и другие способы, но мы рекомендуем именно этот, как самый простой и защищенный.
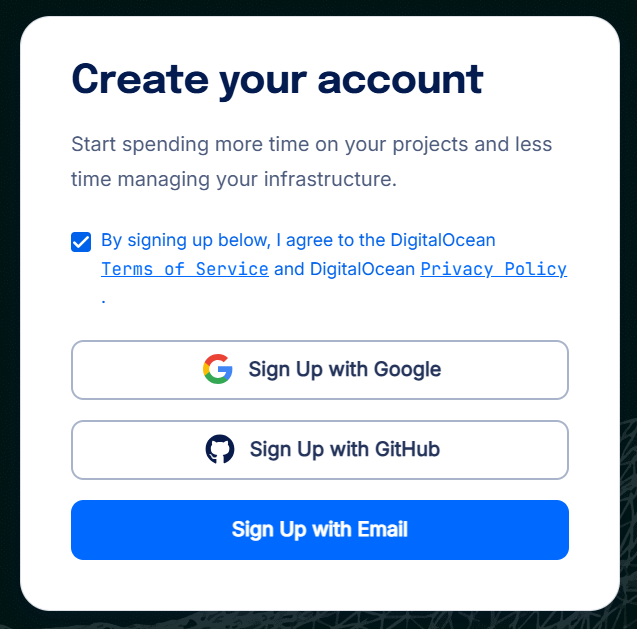
Вы перейдете на сайт Google, где вас попросят подтвердить действие, нажмите кнопку "Continue". После этого Вы будете зарегистрированы на DigitalOcean, и для входа в дальнейшем Вам надо будет нажимать кнопку "Sign In" (или "Log In").
Далее вы сразу попадаете в приветственное меню, где вас спрашивают, что именно вы хотите создать:
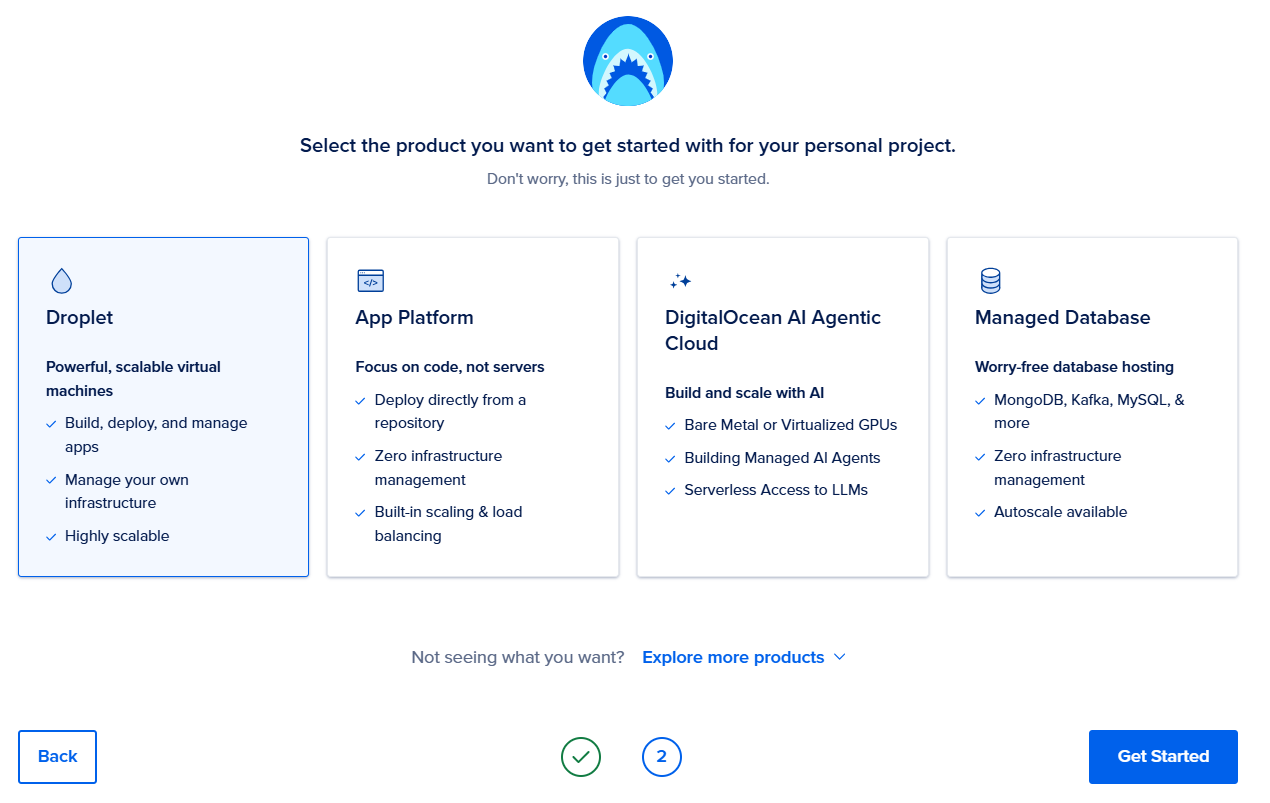
Ваша задача — выбрать первый вариант "Droplet" (да, именно так здесь называется виртуальный сервер) и нажать кнопку "Get Started". Если по каким-то причинам это меню не появилось или вы его случайно закрыли, ничего страшного. Просто отыщите в меню слева или сверху раздел "Create" и выберите там "Droplets".
Шаг 2
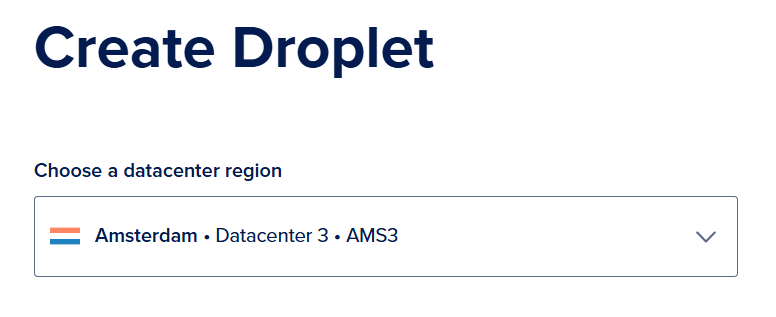
Итак, перед Вами откроется окно, где Вы можете выбрать месторасположение и конфигурацию своего сервера. Помните: ресурсы сервера можно будет увеличить со временем, поэтому в начале нет смысла выбирать дорогостоящие опции. Наоборот, мы покажем, как запустить Melbis Shop за минимальную сумму.
Первым делом необходимо выбрать параметр "Choose a datacenter region", то есть страну и дата-центр в ней. Я обычно выбираю тот, что поближе к моей аудитории, допустим, это будет "Amsterdam AMS3".
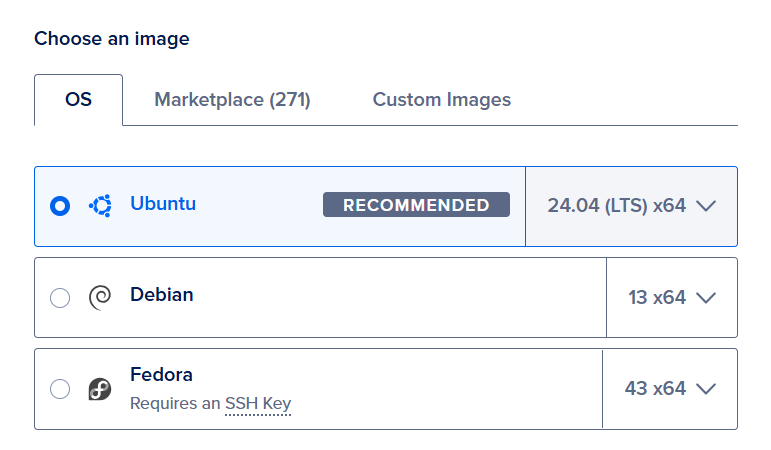
Следующий раздел — это "Choose an image", где нам нужно выбрать базовую операционную систему, которая будет предустановлена на сервере. Для стабильной и проверенной работы мы рекомендуем Ubuntu. Выбираем свежую версию, сейчас это Ubuntu 24.04 (LTS) x64.
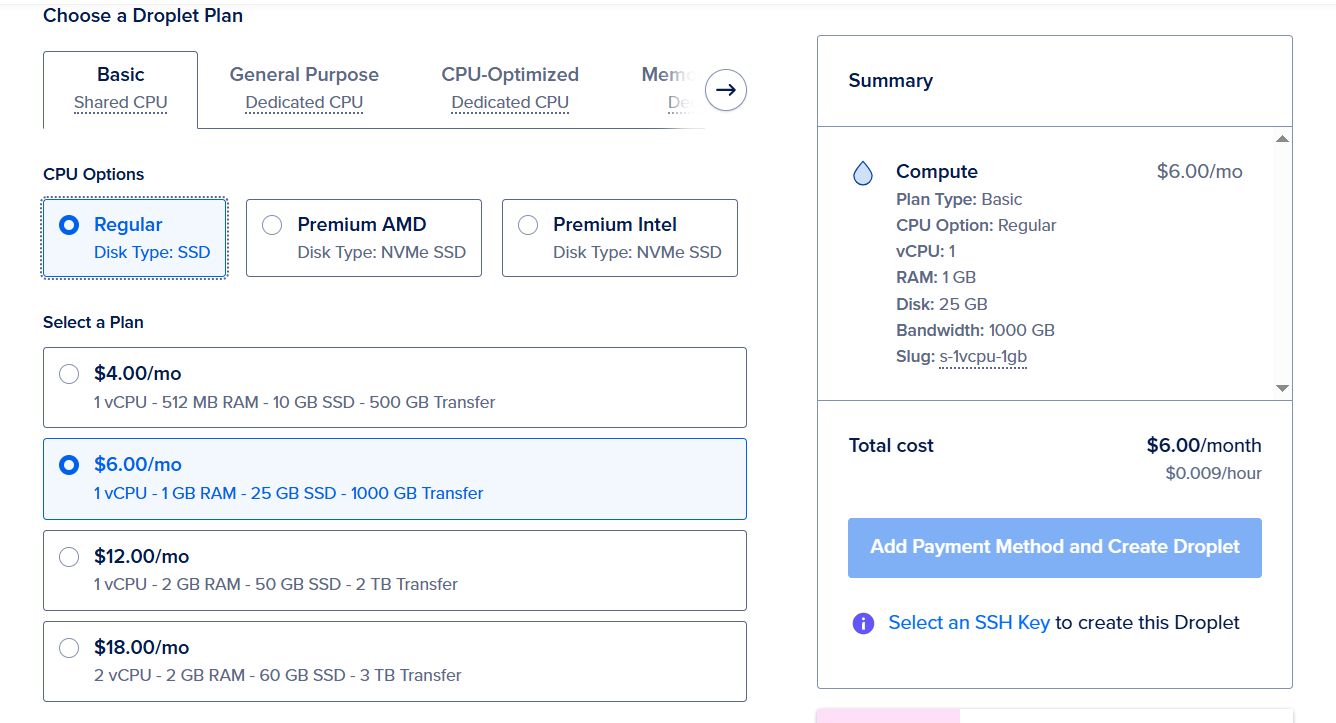
Следующая секция — "Choose a Droplet Plan", где необходимо определить стартовую конфигурацию сервера. Как я уже говорил, мы специально выберем адекватный минимум.
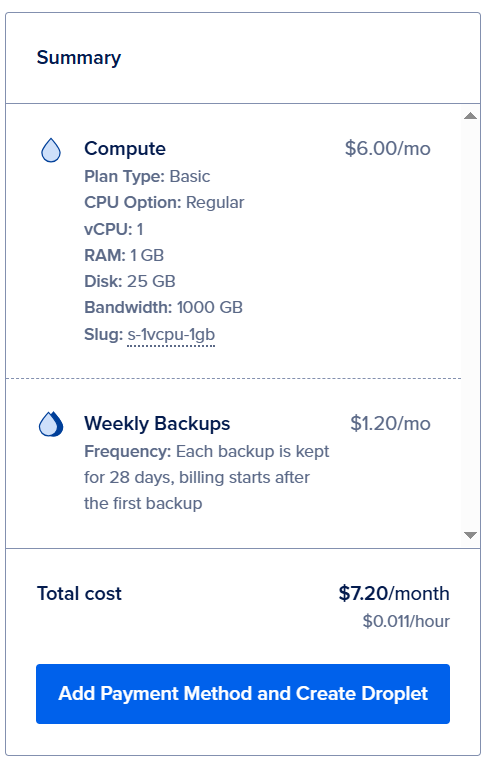
На вкладке "Basic" в параметре "CPU Options" выбираем "Regular Disk" (или SSD) и план за $6 в месяц: "vCPU: 1, RAM: 1 GB, Disk: 25 GB".
Если Вы готовы сразу взять сервер мощнее, рекомендуем "Premium Intel" за $8 в месяц: "vCPU: 1, RAM: 1 GB, Disk: 35 GB".
Выбранная конфигурация будет отображаться в чеке справа.
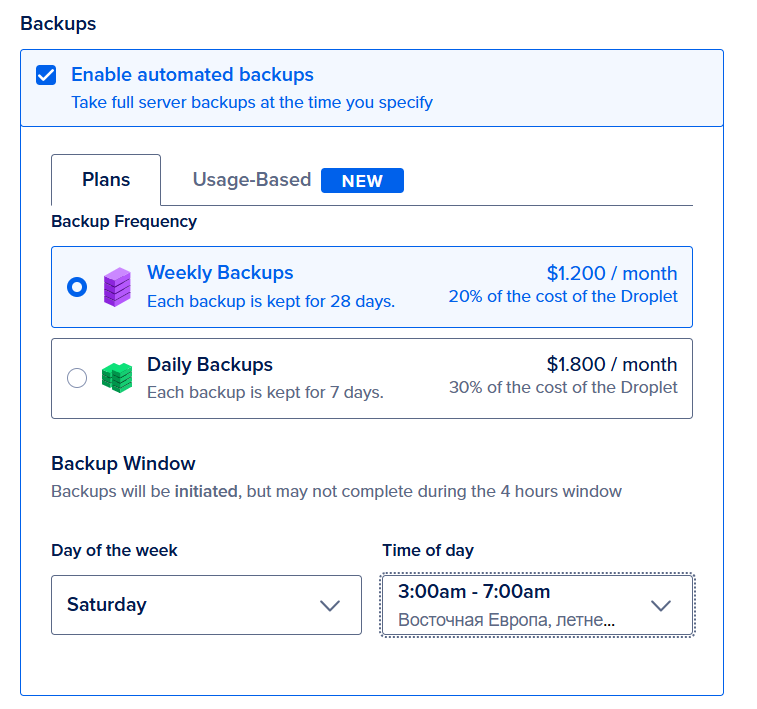
Следующий пункт — резервное копирование данных сервера "Backups". Нет смысла говорить, почему это важно для рабочего проекта. Впрочем, на этапе тестирования можно сэкономить, благо подключить бэкапы можно и позже. Если вы всё же выберете их сейчас, потребуется указать частоту копирования и расписание.
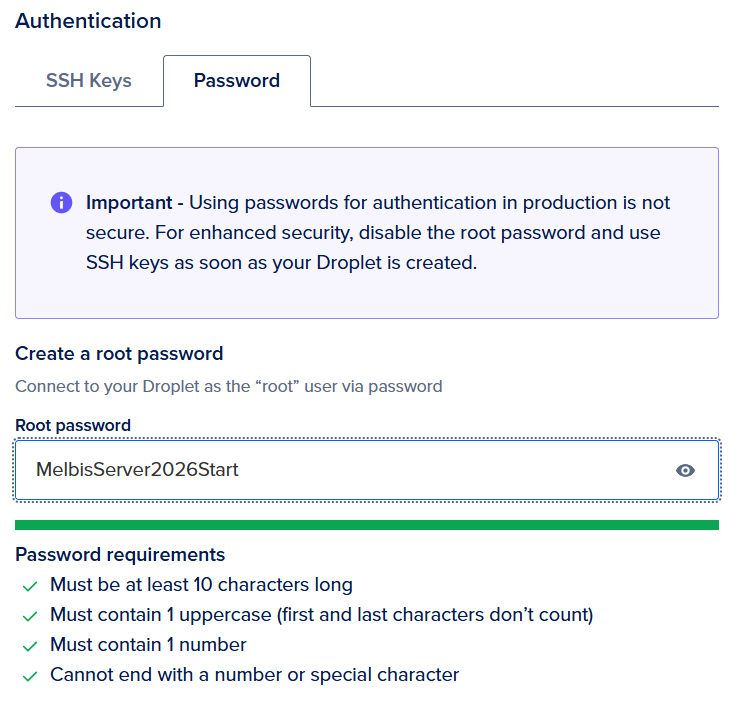
Следующий важный раздел — "Authentication" (способ авторизации на сервере). Здесь мы выбираем вариант "Password", для начала это самый простой и удобный вариант. Далее Вам потребуется придумать пароль для главного суперпользователя системы — "root". Пароль должен быть сложным (система сама не даст указать простой). Это ваш первый ключ от бизнеса. Обязательно сохраните его!
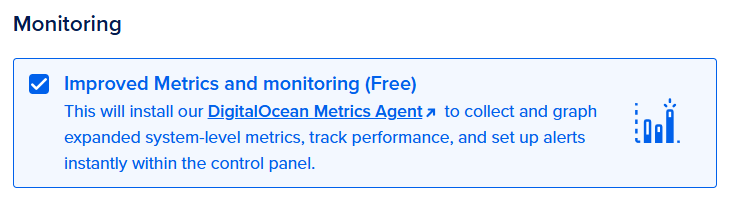
Еще одна полезная секция, которую мы рекомендуем включить — "Monitoring". Это бесплатная опция, которая позволяет отслеживать состояние "здоровья" сервера. Она точно пригодится Вам в будущем!
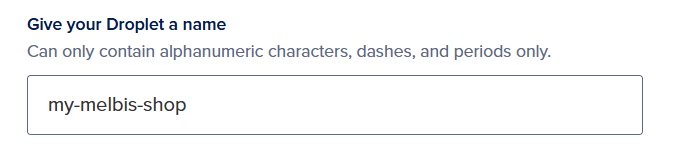
Следующая секция — "Give your Droplet a name". Здесь надо задать имя серверу. По умолчанию туда вбито название тарифного плана, но мы советуем заменить его на более понятное, например, на название вашего проекта (вместо точек лучше использовать дефисы).
Вы готовы заказать свой Droplet (виртуальный сервер). Нажимайте кнопку в чеке "Add Payment Method and Create Droplet".
Шаг 3
На данном этапе останется выбрать способ оплаты и ввести свои платежные данные, например, реквизиты банковской карты.
На этом всё! После успешной оплаты ваш сервер будет создан за считанные минуты и должен появиться в списке.
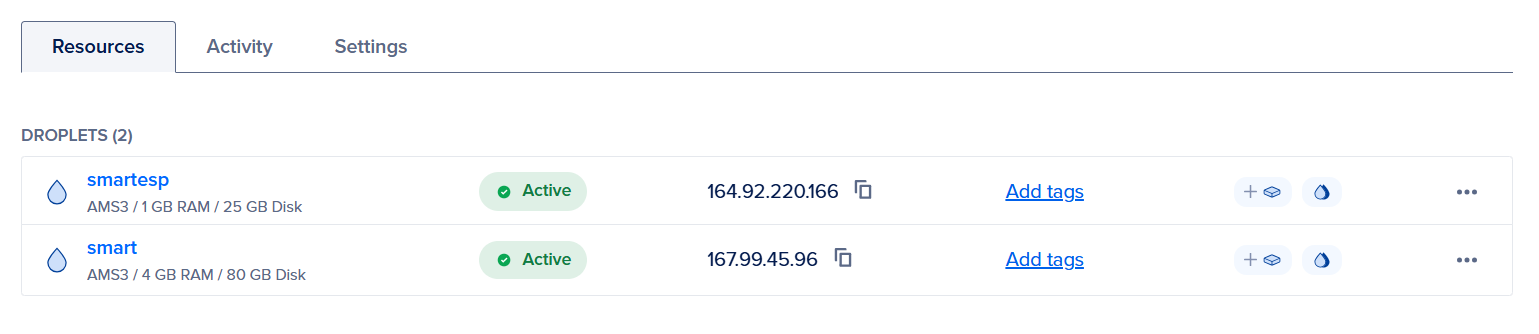
Обратите внимание: напротив вашего сервера будет указан его статус и IP-адрес (четыре числа через точку). Это ваш второй ключ от бизнеса. Обязательно сохраните его, он понадобится в ближайшем будущем. Впрочем, Вы всегда сможете найти его в этой панели.
На этом покупка сервера завершена. Поздравляем вас с успешно выполненным первым шагом! Теперь можно перейти к регистрации домена.