Working with the AI Assistant
The AI assistant is installed and connected to the store — which means it’s time to get to work. In this section: how to start the conversation, how to assign tasks, what to expect from it and what not to expect, what it can do on its own, and how to open up some of its capabilities to your employees.
First contact
So, the store is installed and the AI assistant is configured. Where do you start? Write the first message as simply as possible — to test the connection and see any errors, if there happen to be any. For example:
The AI assistant won’t just say “everything is fine” at face value: it will check each tool one by one and tell you exactly what responded. Something like this:
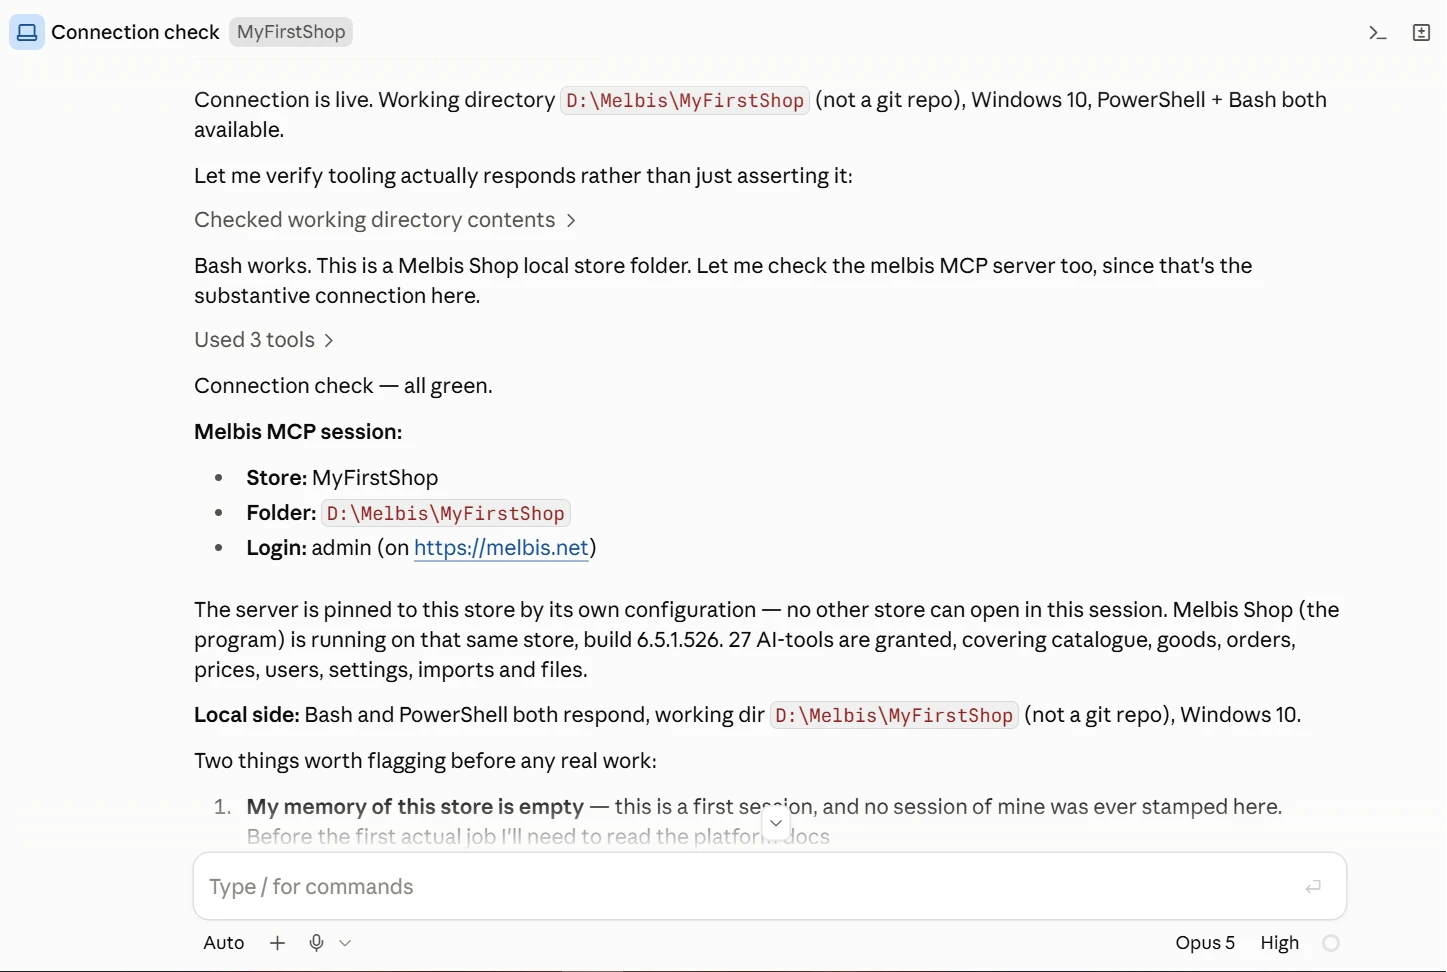
The connection is working. The working folder is D:\Melbis\MyFirstShop (not a git repository), Windows 10, and both PowerShell and Bash are available.
I’ll check that the tools really respond and aren’t just declared.
Bash is working. This is the local folder of the Melbis Shop store. I’ll also check the melbis MCP server, since the connection here is specifically through it.
Connection test — everything is fine.
Melbis MCP session:
- Store: MyFirstShop
- Folder: D:\Melbis\MyFirstShop
- Login: admin (on https://melbis.net)
The server is bound to this store by its own configuration — no other store can be opened in this session. The Melbis Shop application is running on the same store, build 6.5.1.526. 27 AI tools have been provided: catalog, products, orders, prices, users, settings, import, and files.
Local side: both Bash and PowerShell are responding, the working folder is D:\Melbis\MyFirstShop, Windows 10.
Two points should be mentioned before we begin:
- My memory of this store is empty — this is the first session, none of my sessions have been recorded here yet. Before the first task, I need to read the platform documentation and look around the store. This will take time and from the outside it may look quiet — I’ll warn you when I start so I don’t disappear silently.
- Who am I working with? The store asks me to record this: are you the owner, a developer, or an employee with extended access? I’m writing under the admin login, and everything I change will be signed by the store with that name — it’s best to decide this before I touch anything.
Who you introduce yourself as
As you can see, the AI assistant will itself ask you to clarify your role in the store — to choose the appropriate communication style. But whatever role you claim does not give it that person’s permissions: it acts strictly under the user login specified in Melbis Shop.
What exactly that user is allowed to do through the AI assistant is shown in the "System" > "Users" section, on the "Operations and Access Rights" tab, in the "AI Assistant" branch. On the left is the operations tree; on the right is who has access to them: groups and individual users.
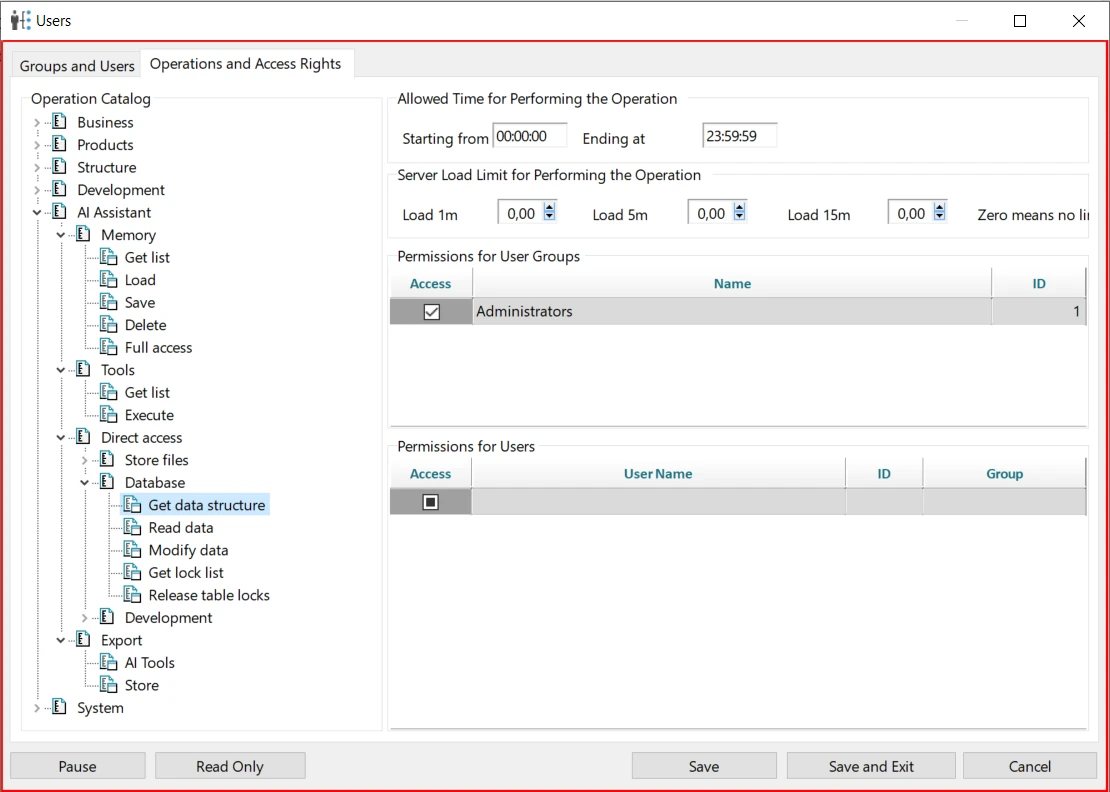
There aren’t that many operations here, and that is intentional. Most of them are “direct access”: Memory — the AI assistant’s notes, Tools — its tools, Direct access — storefront files and direct work with the database. Obviously, such access should only be available to the store owner or a trusted developer. We’ll explain below how regular employees can work with the AI assistant without these super-permissions.
Why the initial store is so simple
Let’s say you introduced yourself as the owner of a store you just installed and perhaps filled slightly with some basic data. This is a good time to answer a question that probably came to your mind on the very first launch: why is the initial store so simple. Now we can answer that clearly.
Our experience in developing software for creating stores is approaching the 25-year mark. Like many others, we started by providing a store with a standard storefront as an example — many platform developers still do this today. But Melbis Shop 6 has outgrown that stage: over six generations, its capabilities have grown far too much.
You see, by trying to assemble a standard sample store, we would be doing you a disservice. Along with the example, you would also get the limitations built in from the very beginning, and you would only realize it years later — when it becomes clear that your specific business model required the store to be designed differently, and reworking it would already be very expensive. In fact, if you need a standard project, then you don’t need your own store at all: a marketplace listing is enough, where standardized features are provided immediately.
That is why, until recently, Melbis Shop 6 customers were rather large niche stores that hired developers for their own unique projects. The entry threshold was high, and we sold noticeably fewer licenses than for Melbis Shop 5, which came with standard functionality and design from the start.
Unnoticed by you, inside Melbis Shop 6 lies a core built on enormous experience, documentation, and real implementation practice. That is why we still do not offer you a standard sample store — we consider it an insult to your entrepreneurial intuition, shackles that restrain creative momentum and lead you down a well-trodden path. Instead, we open the door to collaboration with an AI assistant that will let you focus on ideas rather than routine.
Where to start your business
Our advice: the best place to start is by describing your business model. And the AI assistant does not need a formally structured and meticulously thought-out business plan. Just write plainly, as it is — the way you would explain to a friend what kind of project you want to create and what it will require. Ideas will come as the project develops, and that is completely normal. And the AI assistant will clarify and suggest some things on its own.
Here is an example of such a first message — an ordinary description of the business, without jargon and without structure:
The first thing the AI assistant will do is break this down into clear points and show a plan before changing anything:
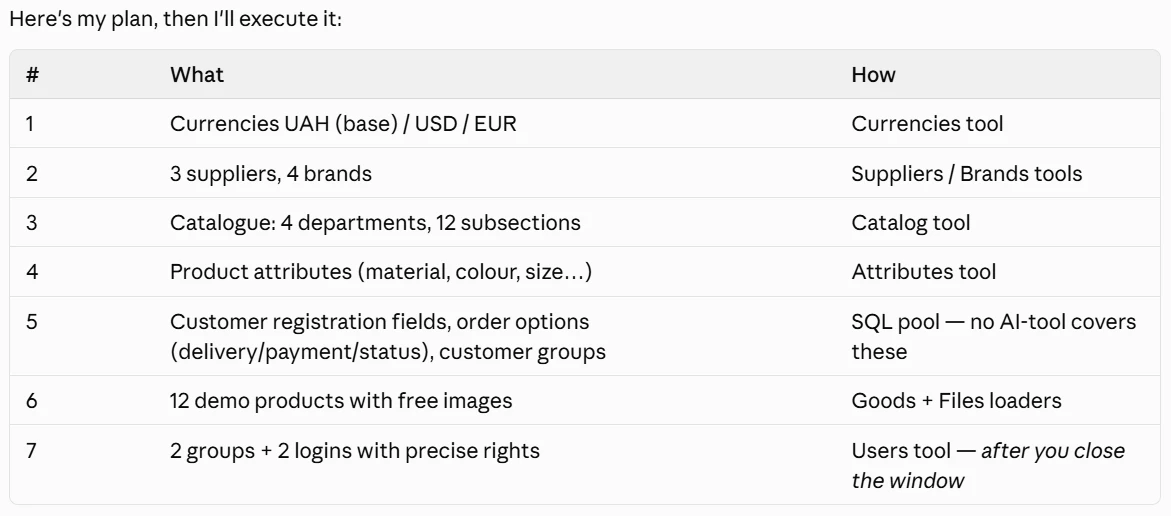
Here is my plan; next I will carry it out:
| # | What | How |
|---|---|---|
| 1 | Currencies: hryvnia (main), dollar, euro | the “Currencies” tool |
| 2 | 3 suppliers, 4 brands | the “Suppliers” and “Brands” tools |
| 3 | Catalog: 4 sections, 12 subsections | the “Catalog” tool |
| 4 | Product attributes (material, color, size...) | the “Attributes” tool |
| 5 | Customer registration fields, order options (delivery, payment, status), customer groups | directly via queries — there is no ready-made tool for this |
| 6 | 12 demo products with free images | product and file uploaders |
| 7 | 2 groups and 2 logins with exact permissions | the “Users” tool — after you close the window |
Notice the seventh point: the AI assistant saw that the users table was occupied by the program’s open window and postponed that part until later on its own. After that it proceeds according to the plan, explaining what it is doing and why. First it reads the platform documentation and looks around the store:
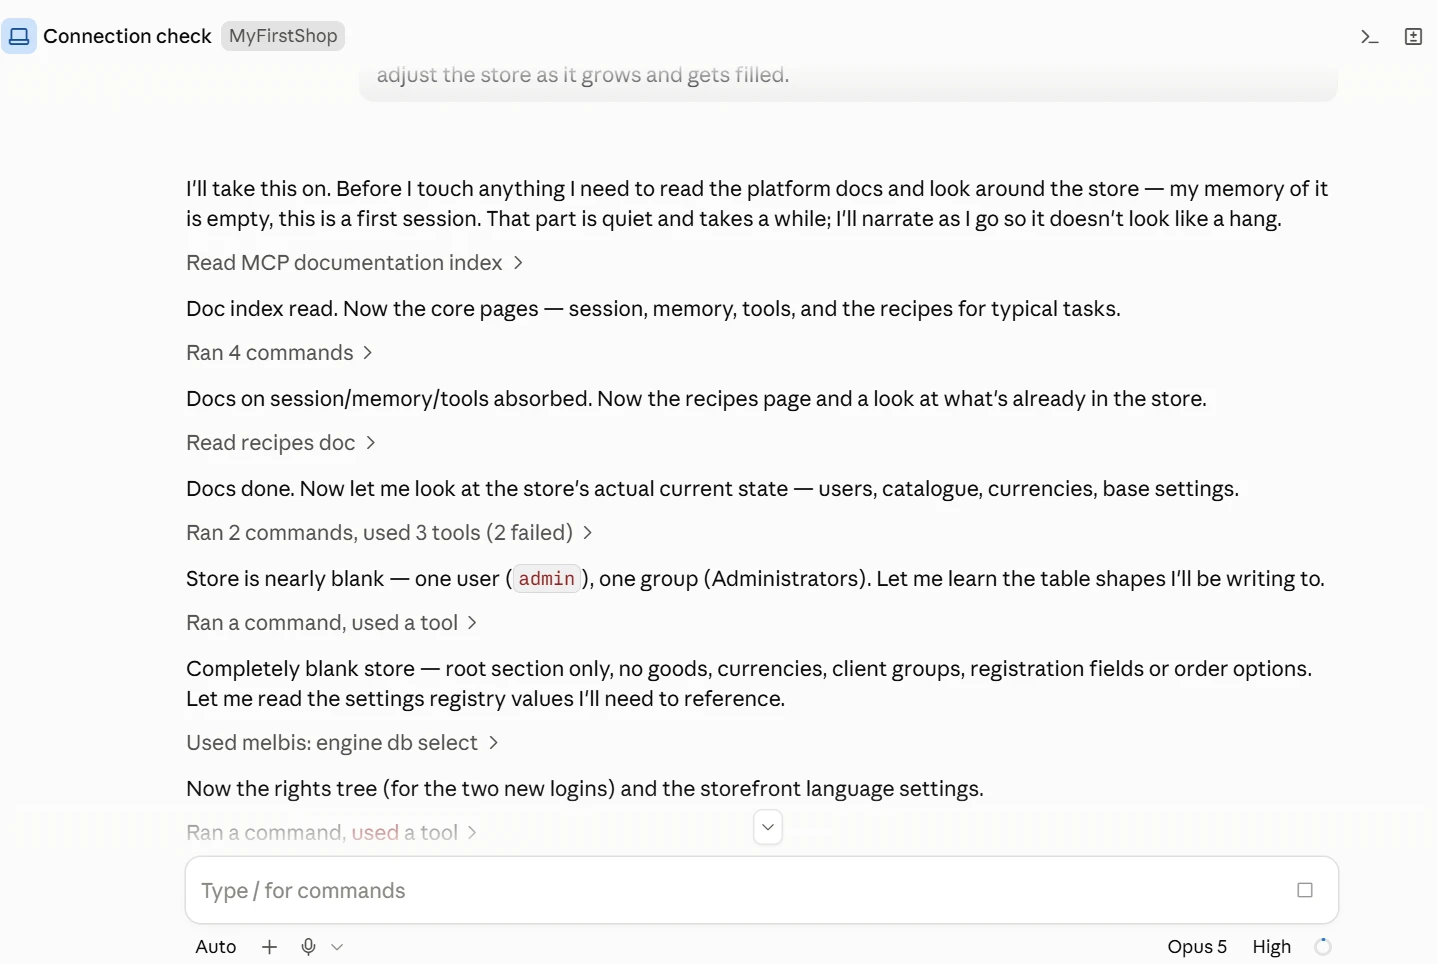
I’m starting. Before touching anything, I need to read the platform documentation and look around the store — I have no memory of it, this is the first session. This stage is quiet and not fast, so I’ll keep narrating as I go so it doesn’t look like I’ve frozen.
MCP documentation index read
The index is read. Now the main pages — session, memory, tools, and common task recipes.
4 commands executed
The documentation on the session, memory, and tools has been absorbed. Now the recipes page and a look at what is already in the store.
Recipe document read
I’m done with the documentation. Now I’ll look at the current state of the store — users, catalog, currencies, basic settings.
2 commands executed, 3 tools used (2 with errors)
The store is almost empty — one user (admin), one group (Administrators). I’ll examine the structure of the tables I’ll be writing to.
Command executed, tool used
The store is completely empty — only the root section: no products, no currencies, no customer groups, no registration fields, no order options. I’ll read the values from the settings registry that I’ll refer to later.
melbis: engine db select
Now the permissions tree — for the two new logins — and the storefront language settings.
Then comes the actual work. Here you can clearly see how the AI assistant doesn’t just execute tasks, but looks for the shortest path: instead of making 79 separate calls to assign permissions, it checks how the identifiers are structured and does everything in one query.
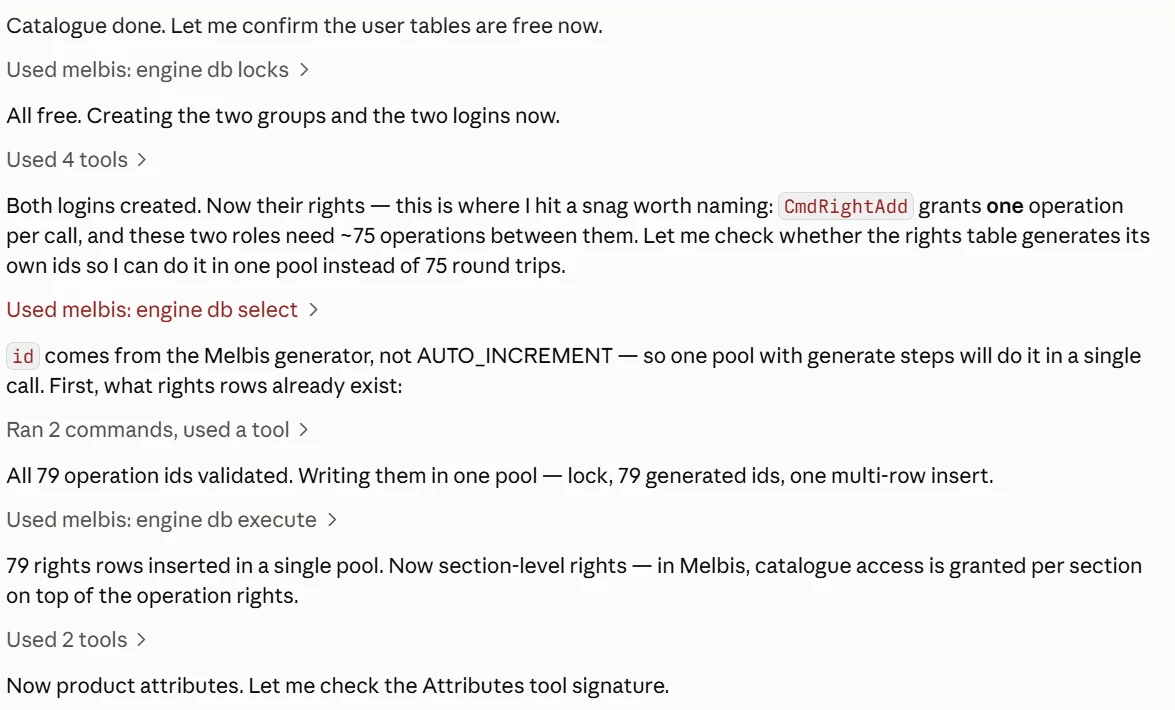
I’m done with the catalog. I’ll check whether the user tables are free now.
melbis: engine db locks
Everything is free. Creating two groups and two logins.
4 tools used
Both logins are created. Now their permissions — and here there’s a catch worth stating aloud: CmdRightAdd grants one operation per call, while these two roles need about 75 operations between them. I’ll check whether the permissions table generates identifiers by itself: if so, I’ll do everything in one batch instead of 75 calls.
melbis: engine db select
The identifier comes from the Melbis generator, not from AUTO_INCREMENT — which means one batch with generate steps will handle it in a single call. First I’ll see what permission rows already exist.
2 commands executed, tool used
All 79 operation identifiers have been checked. Writing them in one batch: lock, 79 generated identifiers, one multi-row insert.
melbis: engine db execute
79 permission rows inserted in one batch. Now section permissions: in Melbis, catalog access is granted by sections — on top of operation permissions.
2 tools used
Now product attributes. I’ll see what the “Attributes” tool accepts.
AI assistant nuances
Can it make mistakes? Yes, it can. Sometimes it doesn’t understand you right away, or it hasn’t fully read the Melbis Shop 6 documentation yet — and, it must be said, it is quite substantial. So be sure to give the AI assistant time to learn and make its beginner mistakes. This stage is inevitable, but we assure you: it goes through it much faster than a human and then performs routine operations more accurately and better, leaving the creative work to you.
What else should you pay attention to? In the bottom-right corner there is a circle — click it, and a window with the current statistics will open.
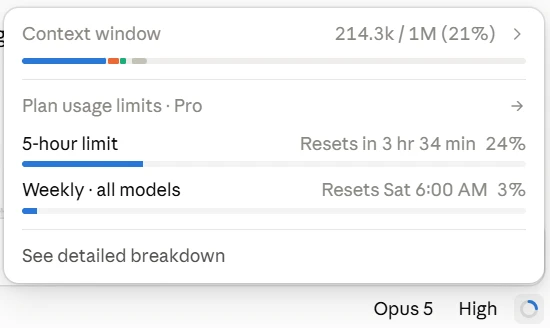
First — the context window: how much the AI assistant can keep in memory at once. It will be compressed automatically (or manually, with the /compact command), and in the process it will forget some details. But this is not total amnesia: internally it has mechanisms for storing intermediate data, and Melbis Shop 6 additionally allows it to keep its notes directly in the store database. So even if you change computers, important things won’t be lost.
Second — the limits of your plan: how much has been used in five hours and in a week. Their usage is shown right here, so you always know how much you still have in reserve.
The first result
So, the AI assistant has finished its first job. At the very end, it checks the result through the buyer’s eyes, writes its conclusions to the store’s memory — so the next session does not start from scratch — and then moves on to the business process:
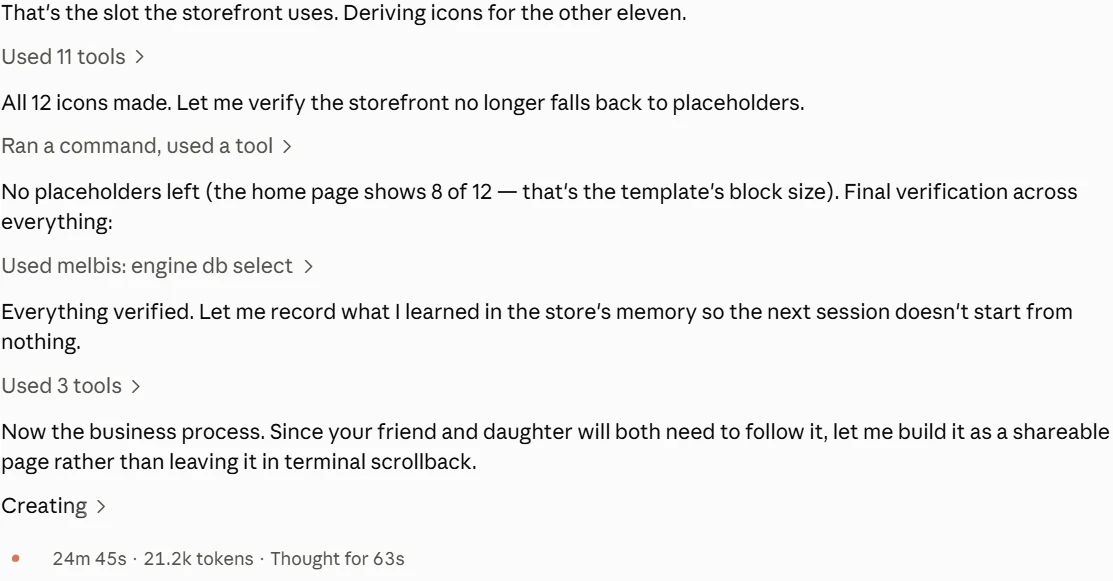
All 12 icons are ready. I’ll check that the storefront no longer shows placeholders.
There are no placeholders left (8 of 12 are visible on the home page — that is the block size in the template). Final check of everything:
Everything has been checked. I’ll write what I learned into the store memory so the next session does not start from scratch.
Now the business process. Both your friend and your daughter will have to follow it, so I’ll assemble it as a separate page rather than leave it in the chat.
24 min 45 sec · 21.2K tokens
Not only did the AI assistant populate the store — it also created an important component of any business: a business process roadmap, which it saved in the Artifacts section. This is a separate page that you can share with employees via a link. It explains who does what and in which program window:
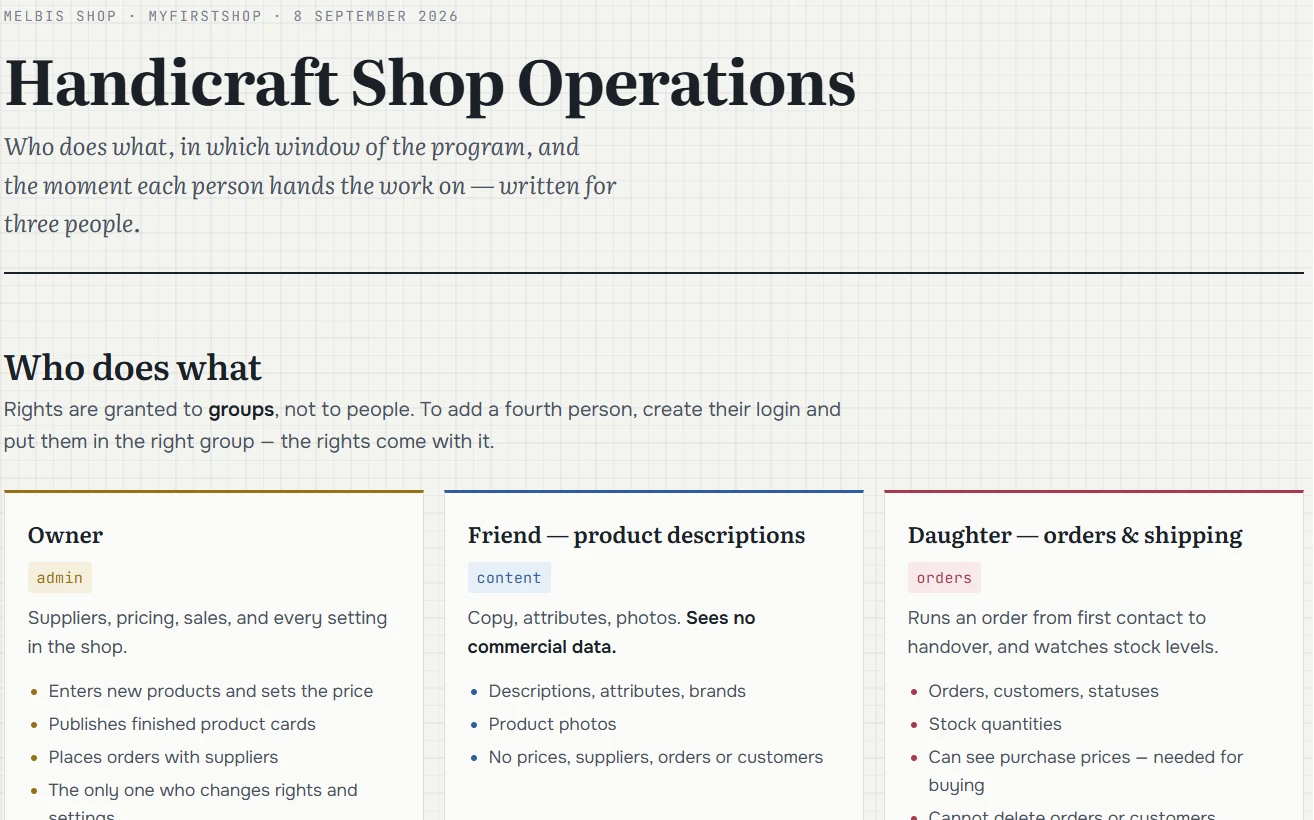
Handicraft Shop Operations — “How the handicraft store works.” Who does what, in which program window, and at what point hands the work over — written for three people.
Who does what — “Who does what.” Permissions are assigned to groups, not to people. To add a fourth person, create a login for them and place it into the appropriate group — the permissions will come with it.
Owner (admin) — “Owner”: suppliers, prices, sales, and all store settings. Friend — product descriptions (content) — “Friend — product descriptions”: texts, attributes, photos; does not see commercial data. Daughter — orders & shipping (orders) — “Daughter — orders and shipping”: manages an order from first contact to handoff and keeps an eye on stock levels.
And how a product moves from a supplier price list to a storefront product card — step by step, with each responsible person indicated:
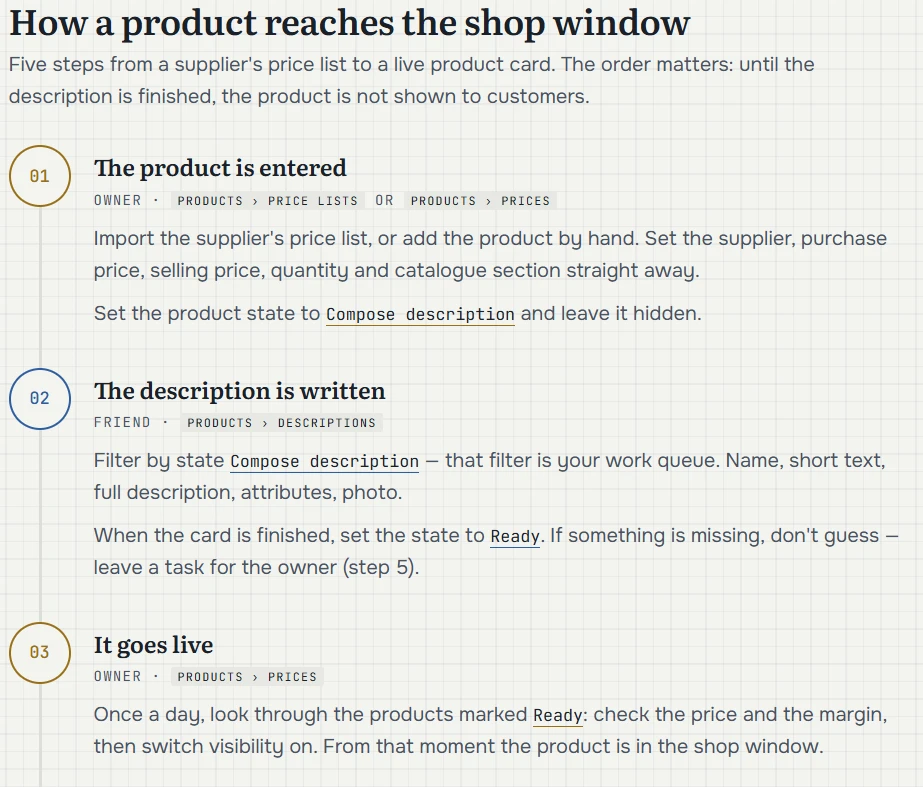
How a product reaches the shop window — “How a product gets onto the storefront.” Five steps from the supplier price list to a live product card. The order matters: until the description is ready, the product is not shown to customers.
01. The product is entered — “The product is entered.” Owner · Products › Price lists or Products › Prices. Upload the supplier’s price list or add the product manually, immediately specifying the supplier, purchase price, selling price, quantity, and catalog section. Status — “Write description,” the product remains hidden.
02. The description is written — “The description is written.” Friend · Products › Descriptions. Filter by the “Write description” status — this is the work queue: title, short text, full description, attributes, photo. Card ready — status “Ready.” Something is missing — do not invent it, but leave the task for the owner (step 5).
03. It goes live — “The product goes live on the storefront.” Owner · Products › Prices. Once a day, review products with the “Ready” status: check the price and markup, then enable visibility. From that moment, the product is on the storefront.
Clear, convenient, and fast.
Now you can open the website and see what came out of it. A catalog with topic-based sections and product cards:
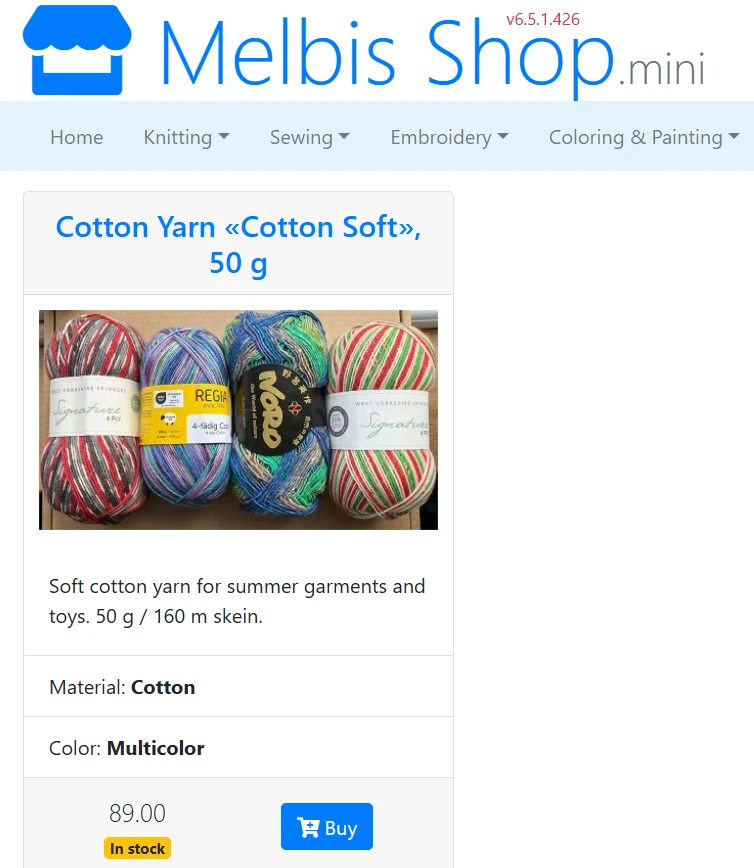
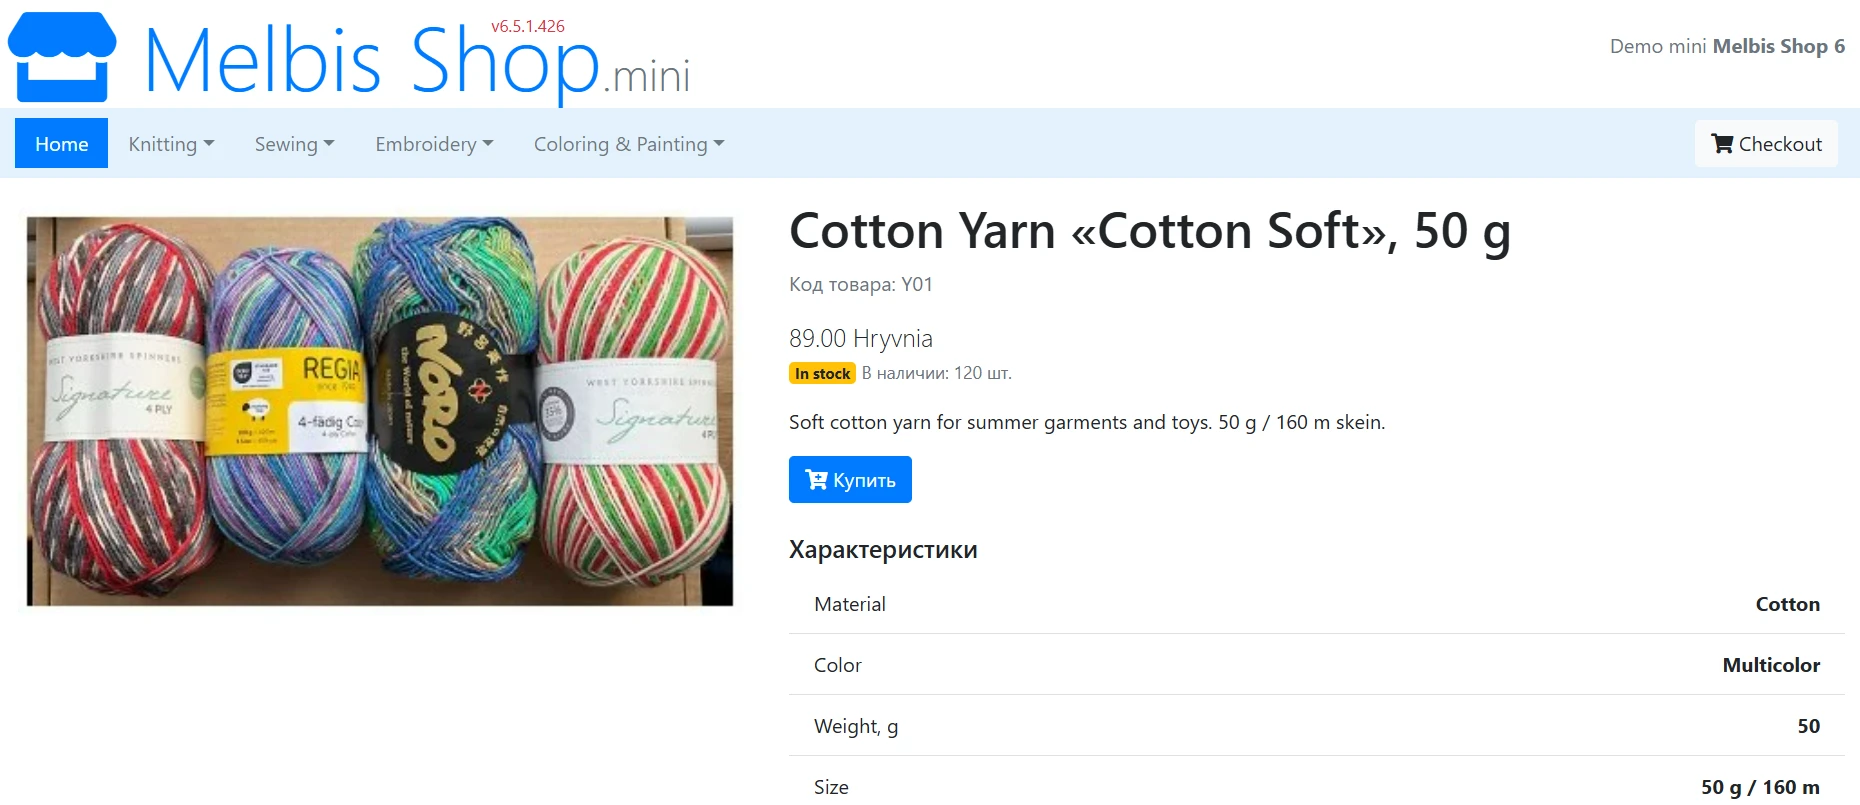
A product page — with price, availability, description, and attributes:
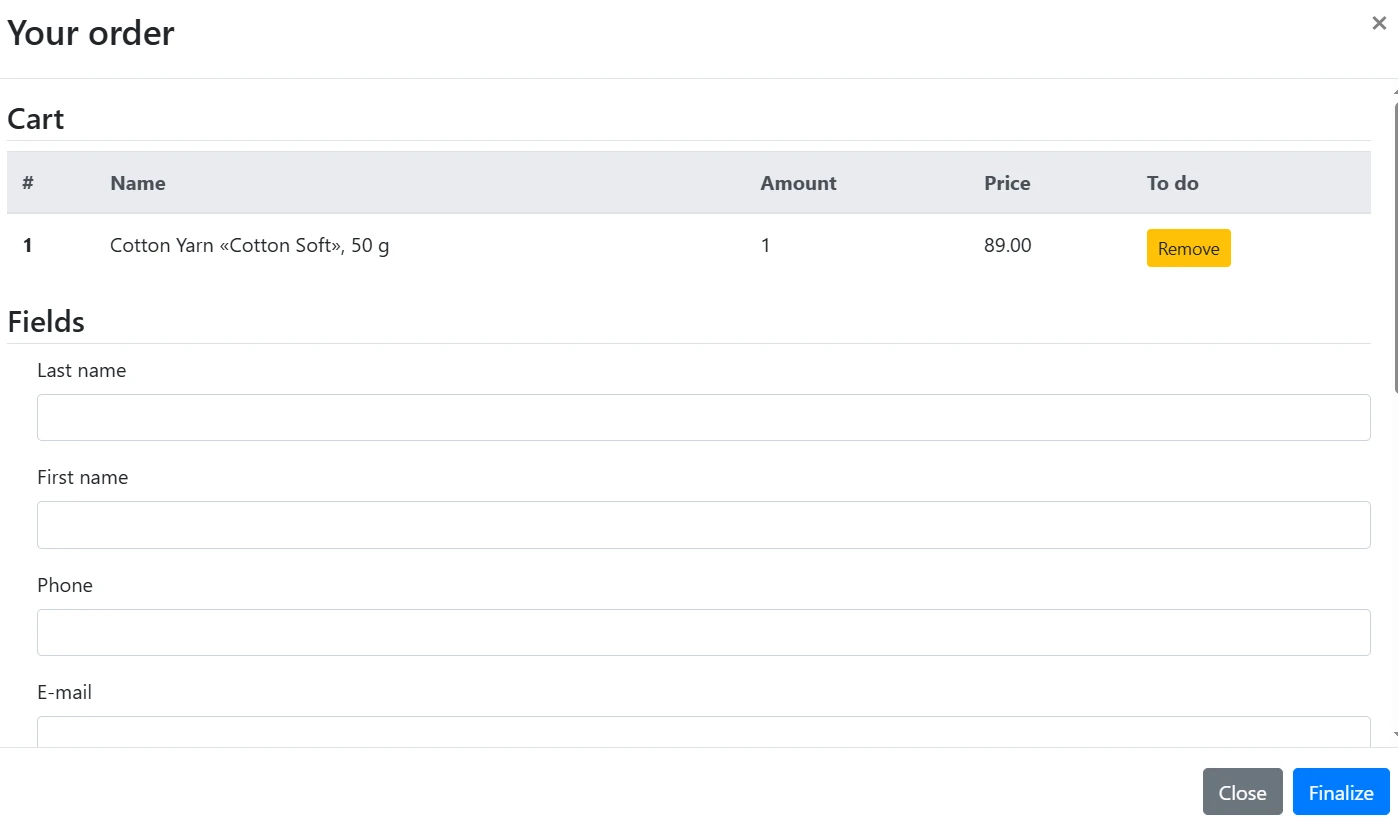
And a simple checkout form with the customer registration fields the AI assistant created based on your description:
This is the first working iteration of the store. From here on, everything is simple: step by step, we refine, describe tasks, and move toward that long-desired ideal.
Step by step
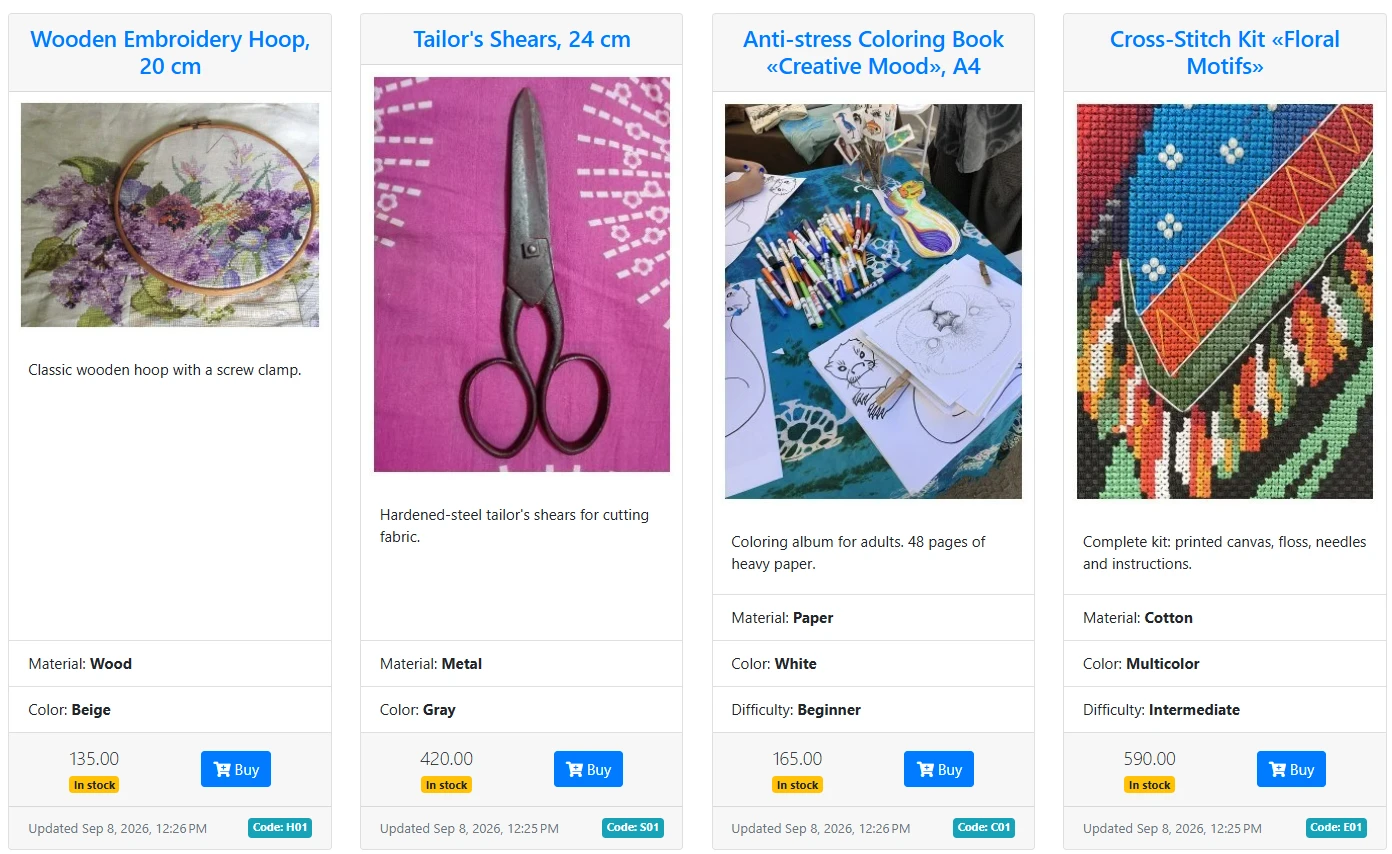
For example, the images in the catalog look bad — they have different shapes, and the grid looks uneven:
You can describe the task in exactly the words you see it — there is no need to know anything about image profiles:
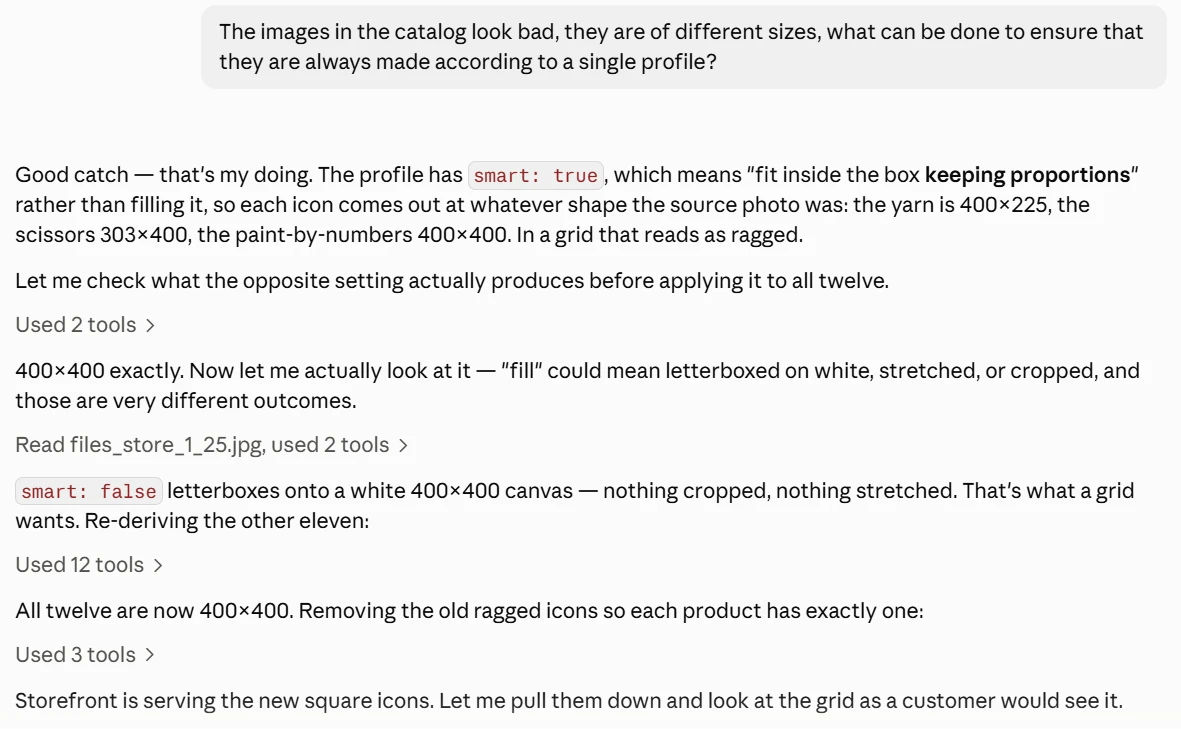
Good catch — that’s on me. The profile is set to smart: true, meaning “fit into the frame while preserving proportions,” not fill it. So each icon ended up with the same shape as the original photo: yarn 400?225, scissors 303?400, coloring book 400?400. In the grid, that is exactly why it looks uneven.
I’ll check what the opposite setting gives before applying it to all twelve.
Exactly 400?400. Now I’ll look at the result visually: “fill” can mean padding on the sides, stretching, or cropping — and those are very different things.
smart: false places the image onto a white 400?400 canvas — nothing is cropped, nothing is stretched. That is exactly what the grid needs. Rebuilding the other eleven.
All twelve are now 400?400. Deleting the old uneven icons so each product has exactly one left.
The storefront is serving the new square icons. I’ll download them and look at the grid the way a buyer will see it.
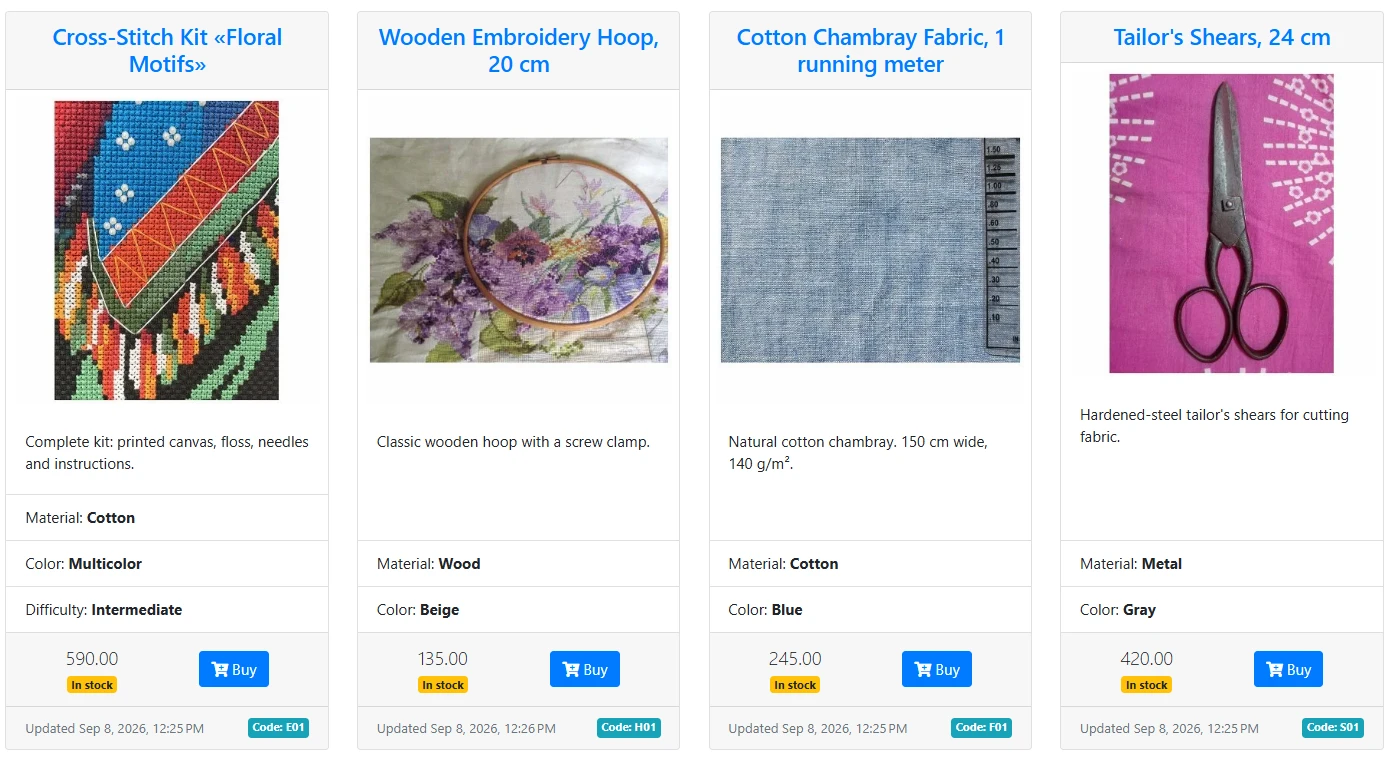
Voilà, done — the grid is aligned:
But the AI assistant didn’t stop there. It noticed on its own that white padding on the sides is only half a solution, cropped the images into squares, and honestly explained where the limits of its capabilities lie:
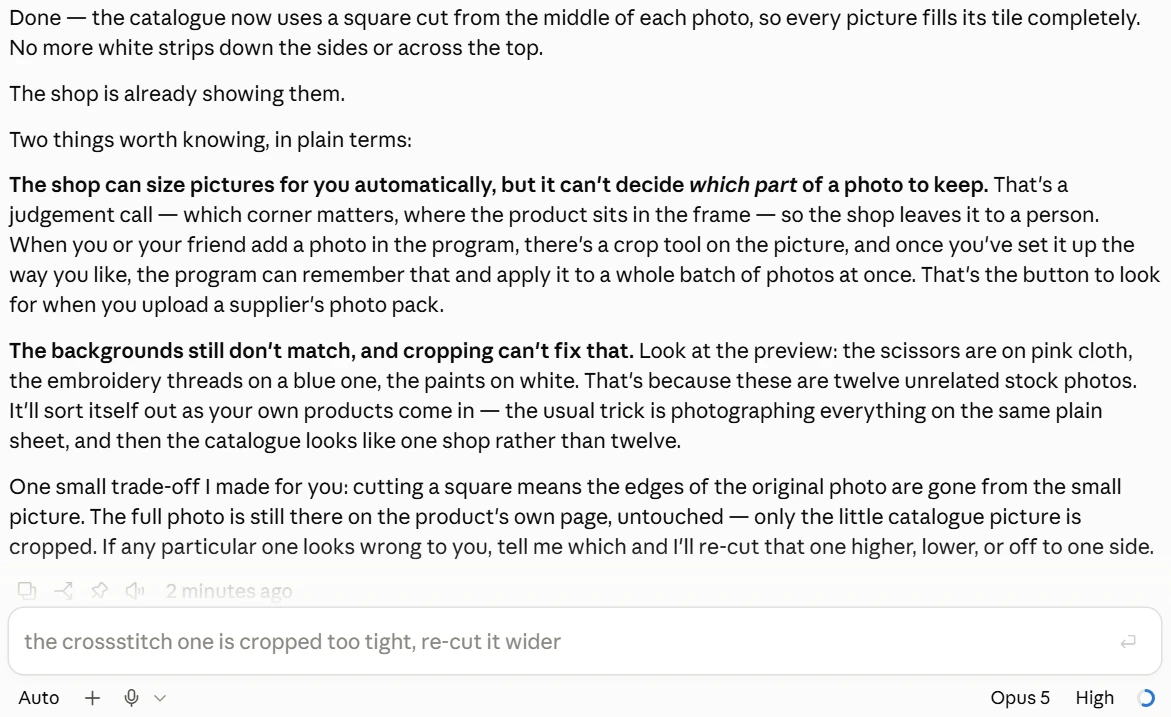
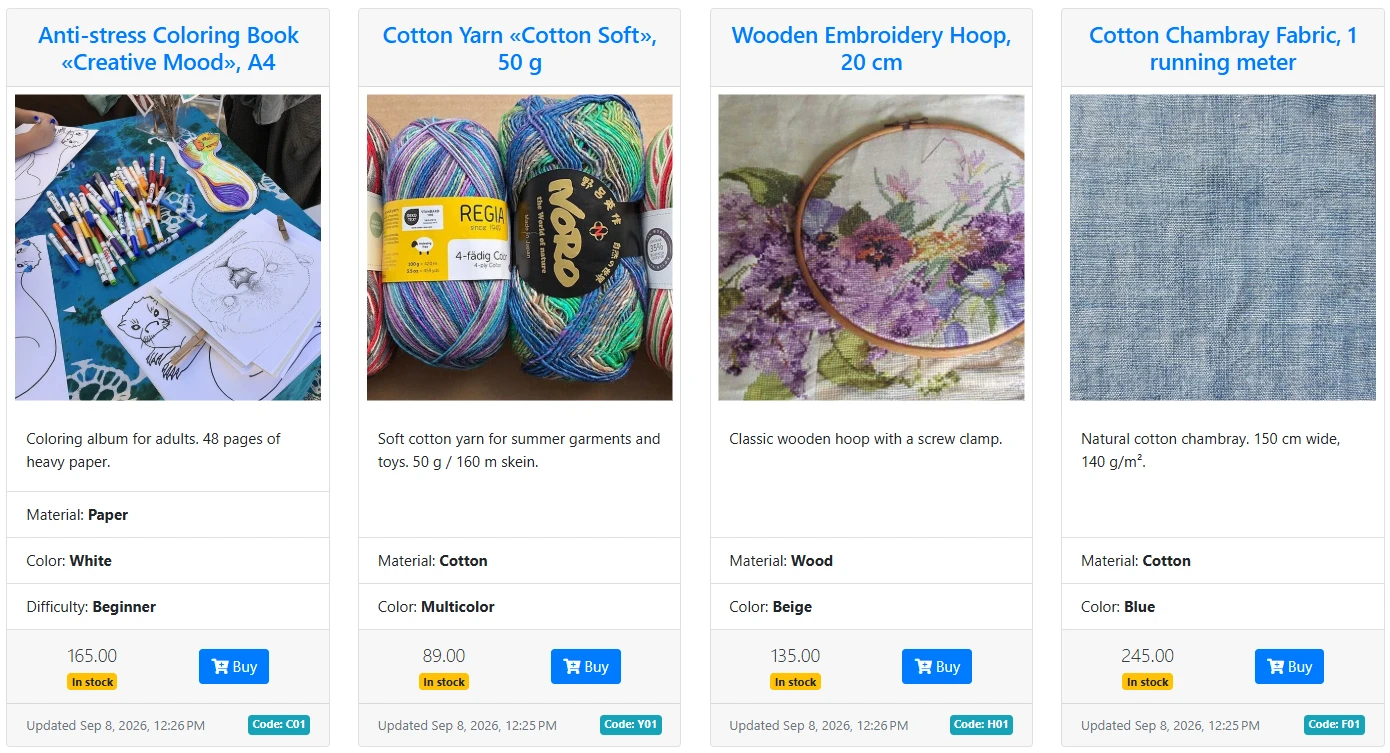
Done — the catalog now takes a square from the center of each photo, and every image fills its tile completely. The white bars on the sides and at the top are gone. The store is already showing them.
Two things worth knowing, in plain words:
The store can resize images by itself, but it cannot decide which part of the photo to keep. That is a matter of taste — which corner matters, where the product sits in the frame — and the store leaves that to the person. When you or your friend add a photo in the program, the image has a cropping tool; once you set it the way you like, you can ask the program to remember it and apply it to the whole batch of photos at once. That is the button that will come in handy when you upload a pack of supplier images.
The backgrounds are still different, and cropping won’t fix that. Look at the storefront: scissors on pink fabric, threads on blue, paints on white. These are twelve unrelated stock photos. Everything will straighten out when your own products appear: the usual approach is to photograph everything on the same plain backdrop, and then the catalog looks like one store rather than twelve.
And one trade-off I made on your behalf: since a square is taken, the edges of the original photo disappear in the small image. The full photo is still on the product page, untouched — only the small catalog image is cropped. If any of them looks unsuccessful to you, tell me which one, and I’ll reframe it higher, lower, or to the side.
And here is the result — square images fully fill the tiles:
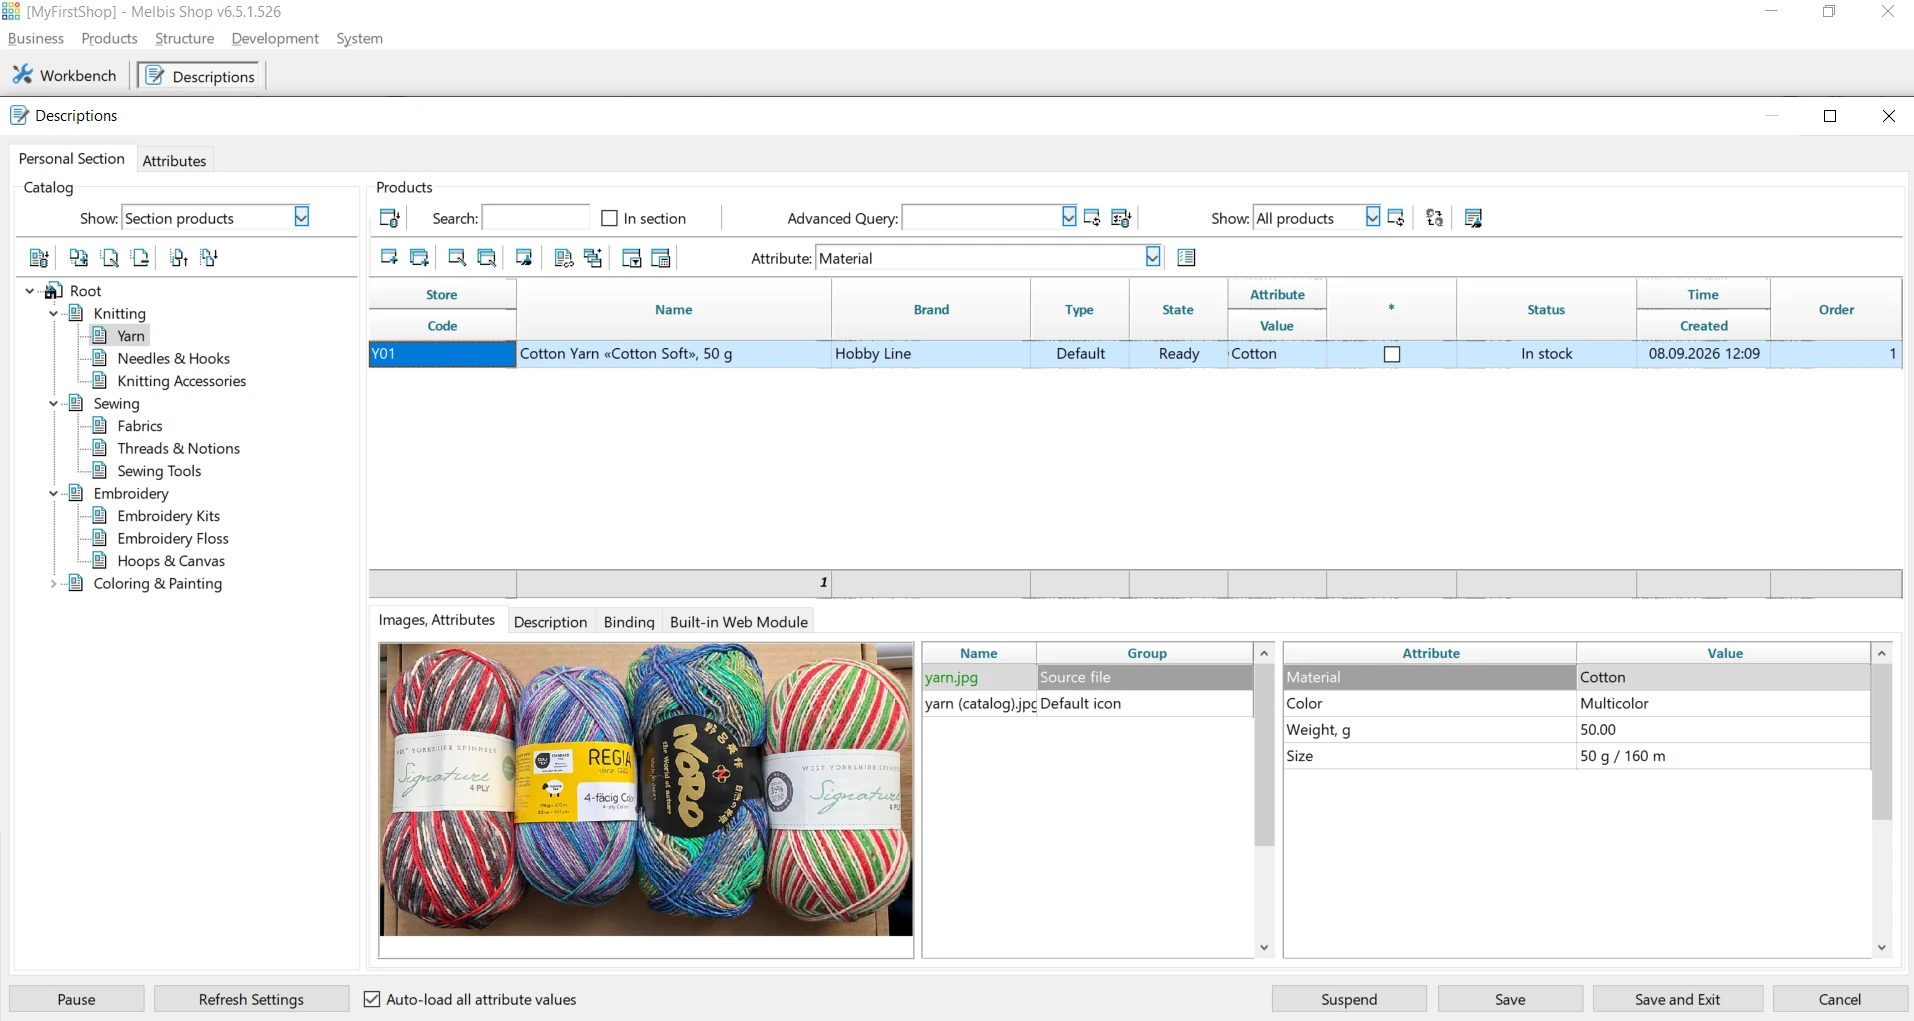
Of course, you can also access the store through the program. In the "Descriptions" section, you can see all the products filled in by the AI assistant with images, attributes, and texts — and you can edit them manually:
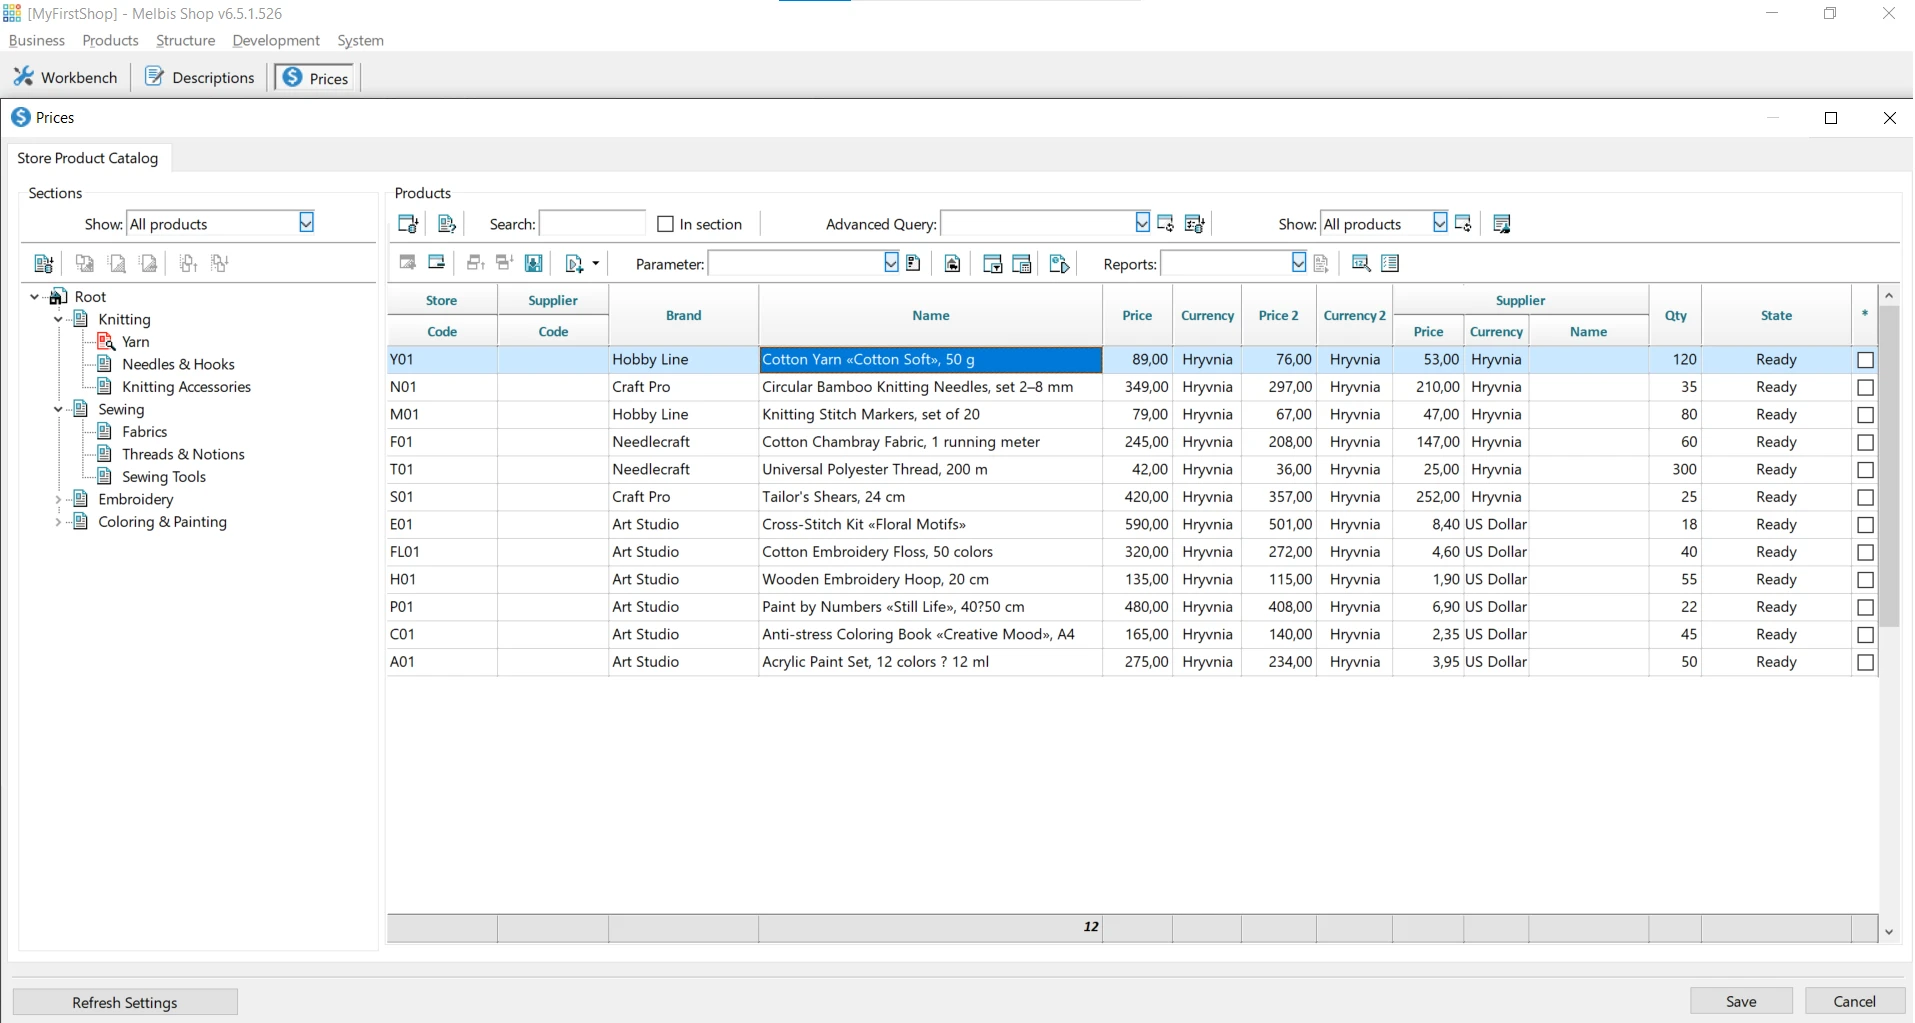
And in the "Prices" section — the entire commercial side: supplier, purchase and selling price, currency, quantity, and product status:
Recursive development
As you can see, in just about half an hour we went from a simple idea to a first result. You probably already have questions: how far can the AI assistant extend the store’s capabilities? And if you can work this fast, it would be nice if employees could work just as fast too — but what, should you give them full access?
Stay calm. You invested in Melbis Shop 6, and there is a scalable structure here.
First of all: the AI assistant in direct access mode, meaning as an administrator, has tremendous powers — both in terms of resources and in terms of self-improvement. It can do far more than just fill in products and set configuration: it is capable of developing and refining the database architecture, shaping the storefront and internal modules, viewing the storefront through the buyer’s eyes, analyzing it, obtaining internal reports on system performance, and making corrections. But most importantly — it can improve tools. Both its own and other people’s.
Remember the permissions branch in the screenshot above: AI Assistant > Tools > Get list and Execute? These are special commands that you can open to your employees — and then the AI assistant tools developed specifically by you or by the employees themselves will become available to them.
In the initial Melbis Shop 6 store, we have already created and added a number of such tools. They will be useful to you on their own and will also serve as a training example for your AI assistant. To see them, open the "Development" > "AI tools" section.
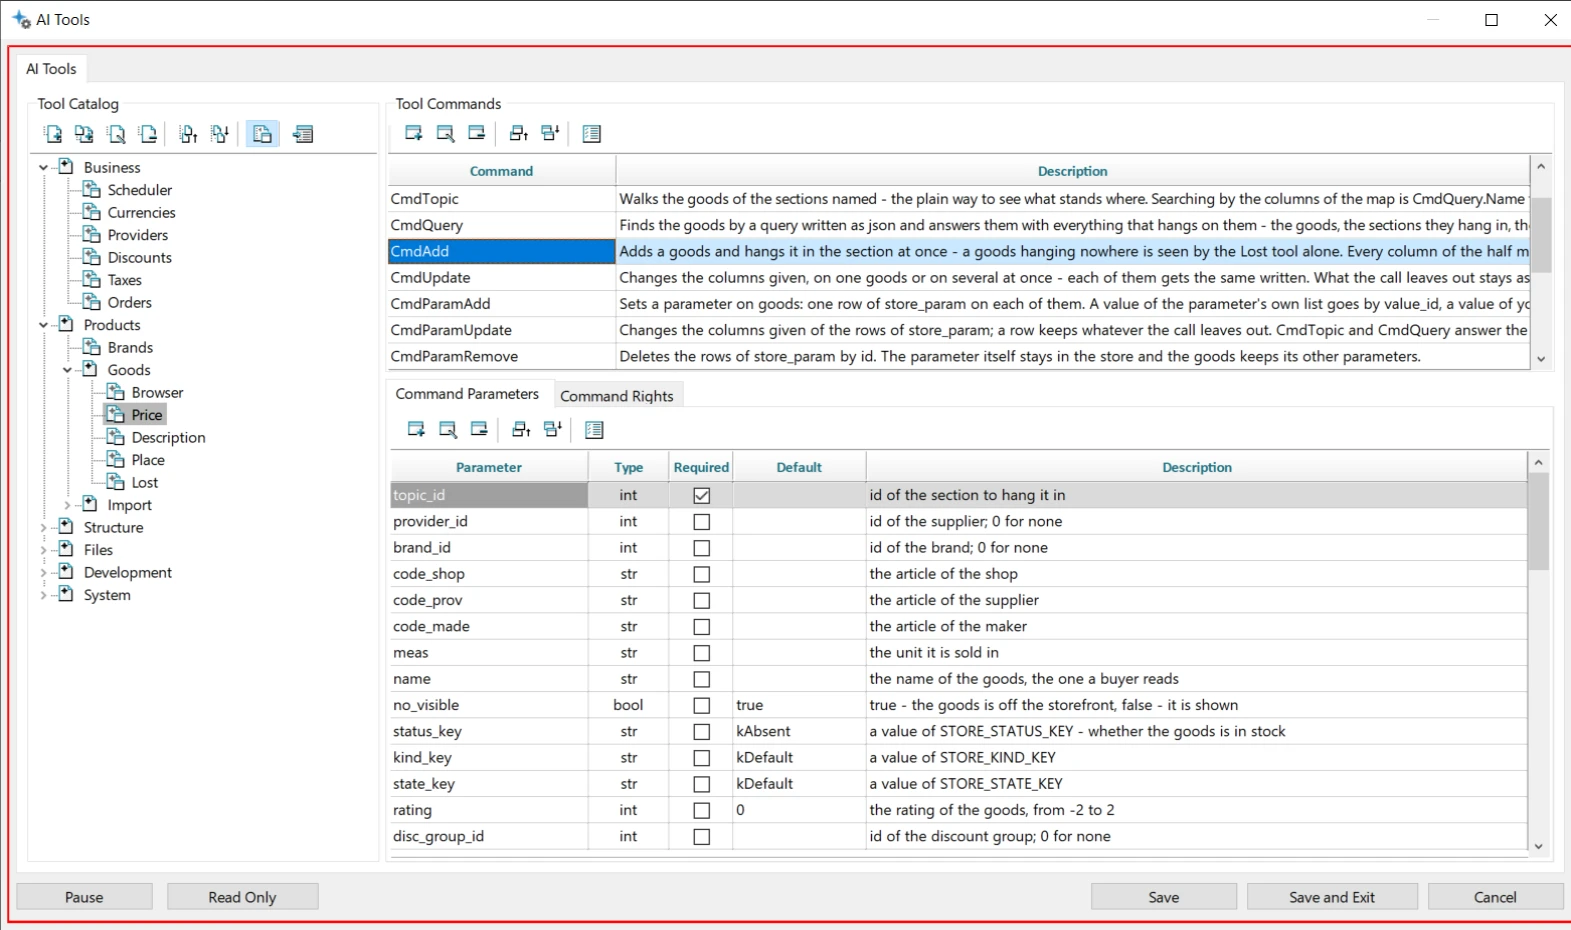
On the left is the tool catalog, arranged by program sections: products, orders, suppliers, structure. On the right are the commands of the selected tool with descriptions, and below them the parameters of each command: what is required, what has a default value, what each field means. It is from these descriptions that the AI assistant understands how to use the tool.
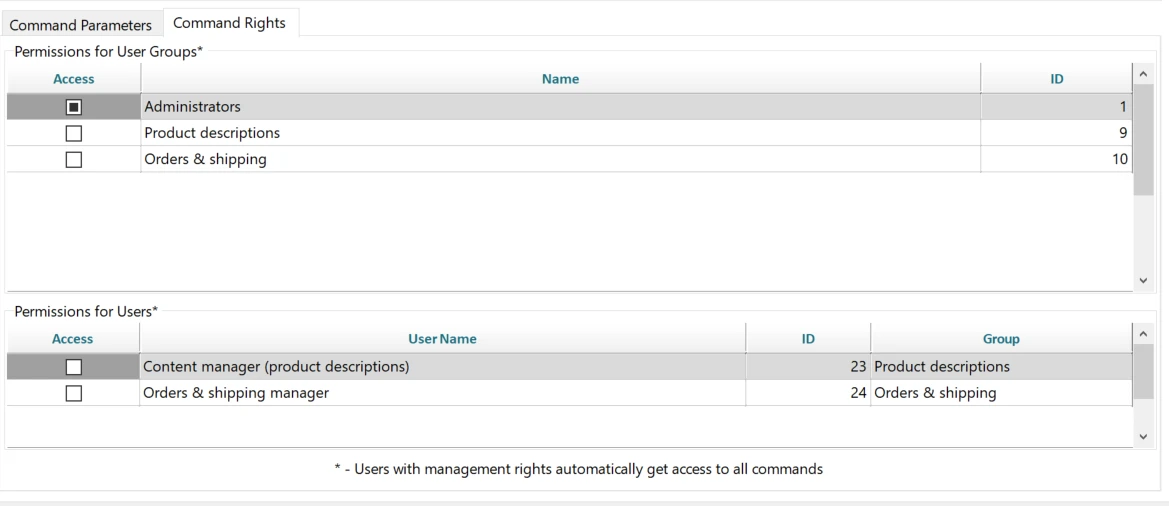
But the most interesting part is the "Command Rights" tab: here you specify what each employee is allowed to do. In other words, an employee can call on the AI assistant and use only those tool commands that you have opened to them — and nothing beyond that.
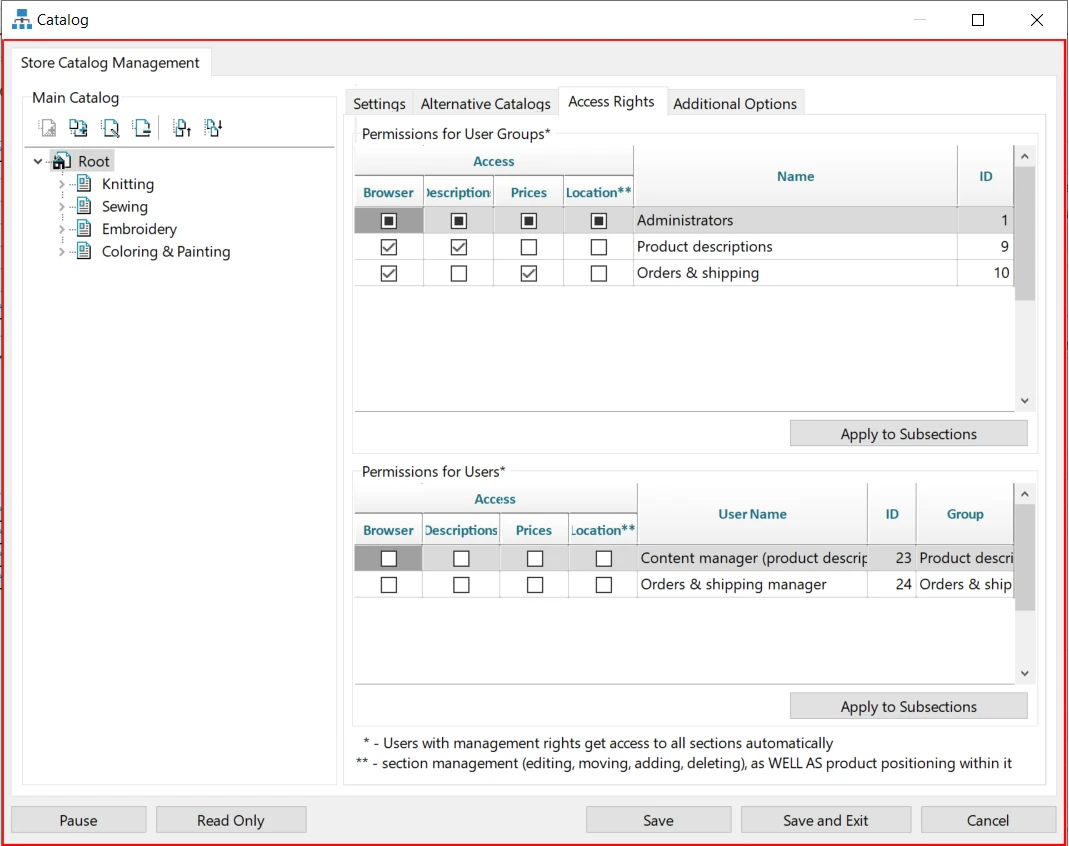
And in sections such as "Catalog", you can additionally set the access level for an individual catalog section: who can see the section storefront, who can edit descriptions, and who can edit prices.
If you want, tools can be saved and transferred — or updated — from one store to another. You can ask the AI assistant to translate their descriptions into your language so it is easier to work with them. You can also have it assign permissions. At that point, it simply becomes a question of what is faster: writing the task for the AI assistant or going through the options yourself.
How to organize the work
We recommend splitting tasks into separate topics. In the Claude Code window on the left, in the list of topics, click + and start a new conversation. That way, each topic has its own memory and its own history, and they do not interfere with one another. Here, for example, is a separate conversation in which we change the look of the demo store:
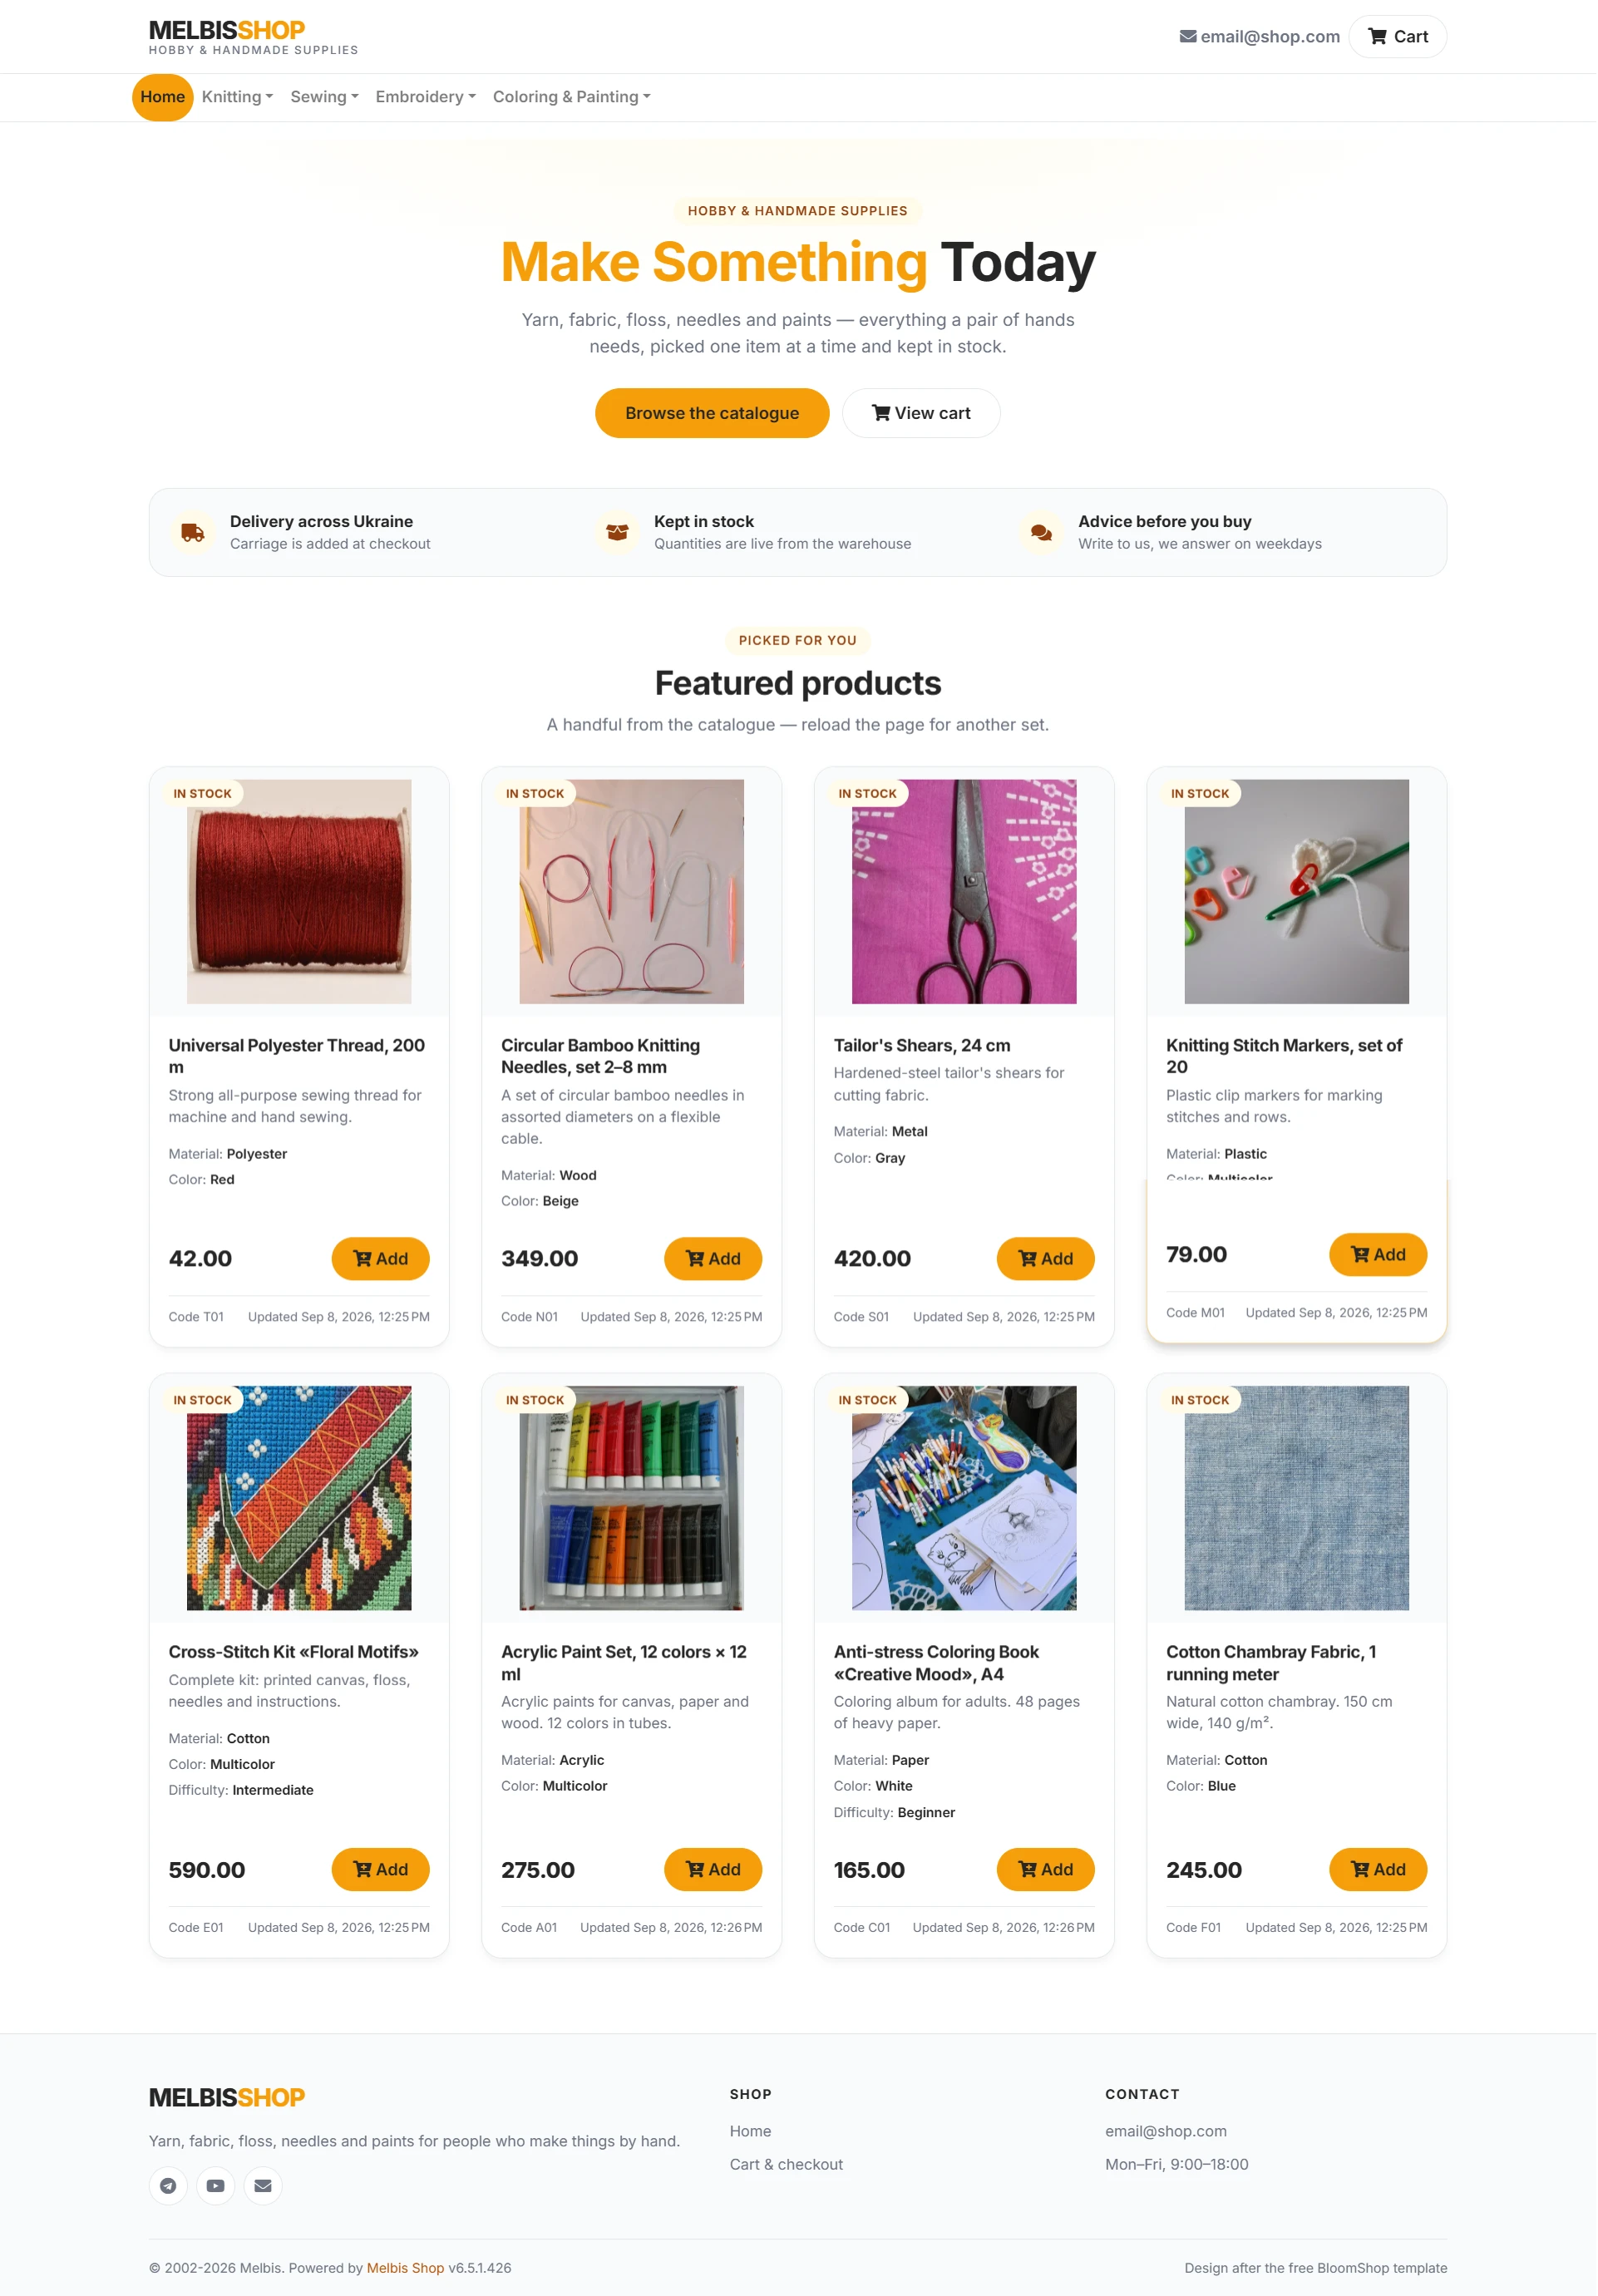
Notice this: the template is built on a completely different technology, and the AI assistant did not try to drag that technology into the project, but instead transferred the visual language — colors, rounding, shadows, font — onto the markup the store already has. Here is its report:
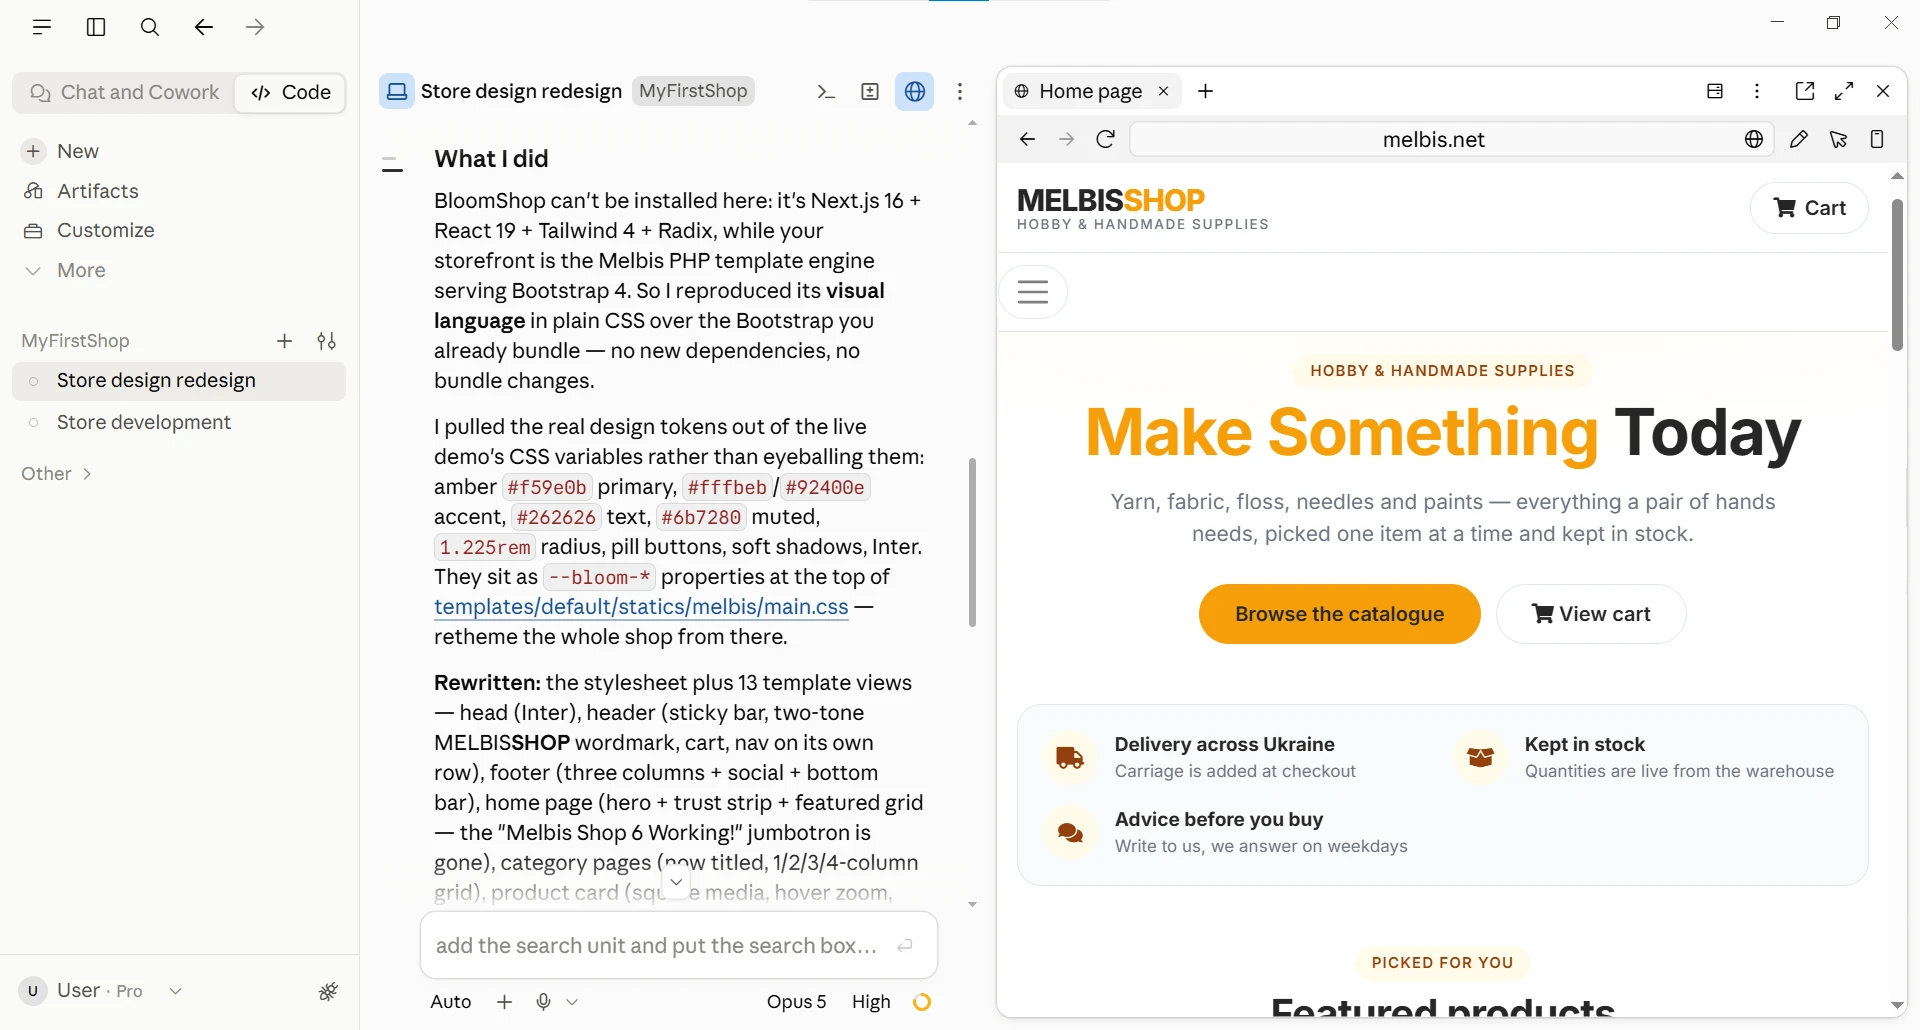
What I did
BloomShop cannot be installed here: it is Next.js 16 + React 19 + Tailwind 4 + Radix, whereas your storefront is the Melbis PHP templating engine outputting Bootstrap 4. So I reproduced its visual language with plain CSS on top of the Bootstrap you already have connected — with no new dependencies and no bundle rebuilds.
I took the actual design values from the CSS variables of the live demo, not by eyeballing them: amber #f59e0b as the main color, #fffbeb / #92400e as the accent, #262626 text, #6b7280 muted, radius 1.225rem, pill buttons, soft shadows, Inter font. They are all stored as --bloom-* properties at the top of templates/default/statics/melbis/main.css — from there, the whole store can be recolored.
Rewritten: the stylesheet and 13 templates — header (sticky bar, two-tone MELBISSHOP lettering, cart, menu on a separate line), footer (three columns, social media, bottom bar), home page (hero section, benefits strip, featured products grid — the “Melbis Shop 6 Working!” jumbotron is removed), section pages, product card, and the rest.
Another half hour — and here is the finished result. The home page with a hero section, benefits strip, and featured products grid:
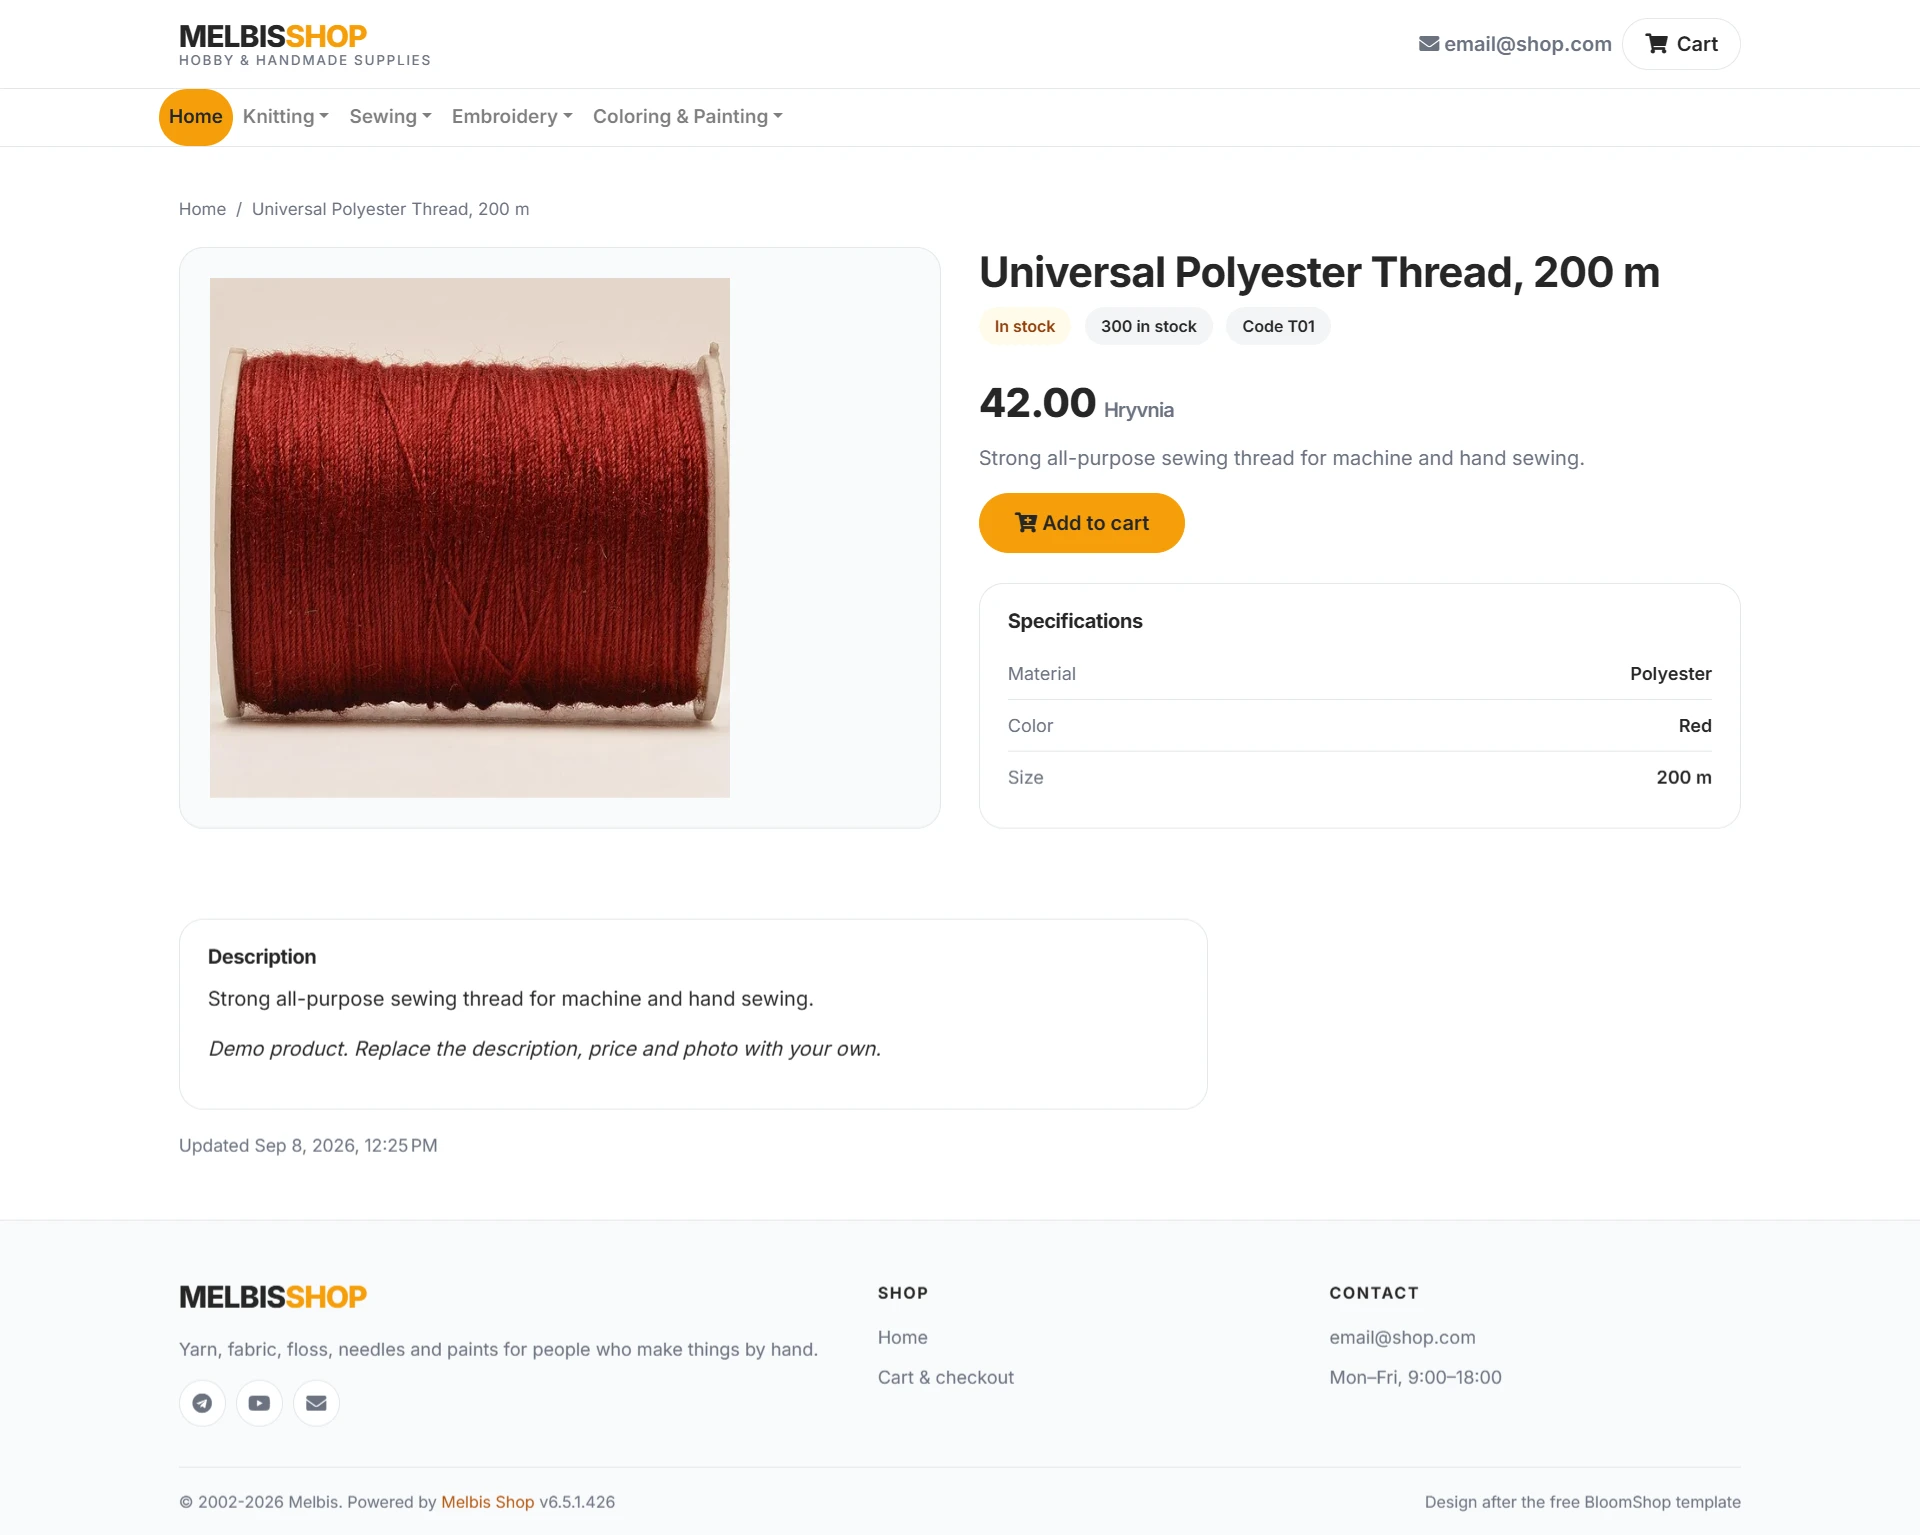
And the product page in the same style. No comment.